Crochet Bow Gift Topper Pattern – Reusable Christmas Package Bow
Beautiful gift wrapping doesn’t have to end up in the trash five minutes after the present is opened.

This crochet bow gift topper pattern turns a small amount of leftover yarn into a reusable Christmas bow that can decorate gifts year after year.
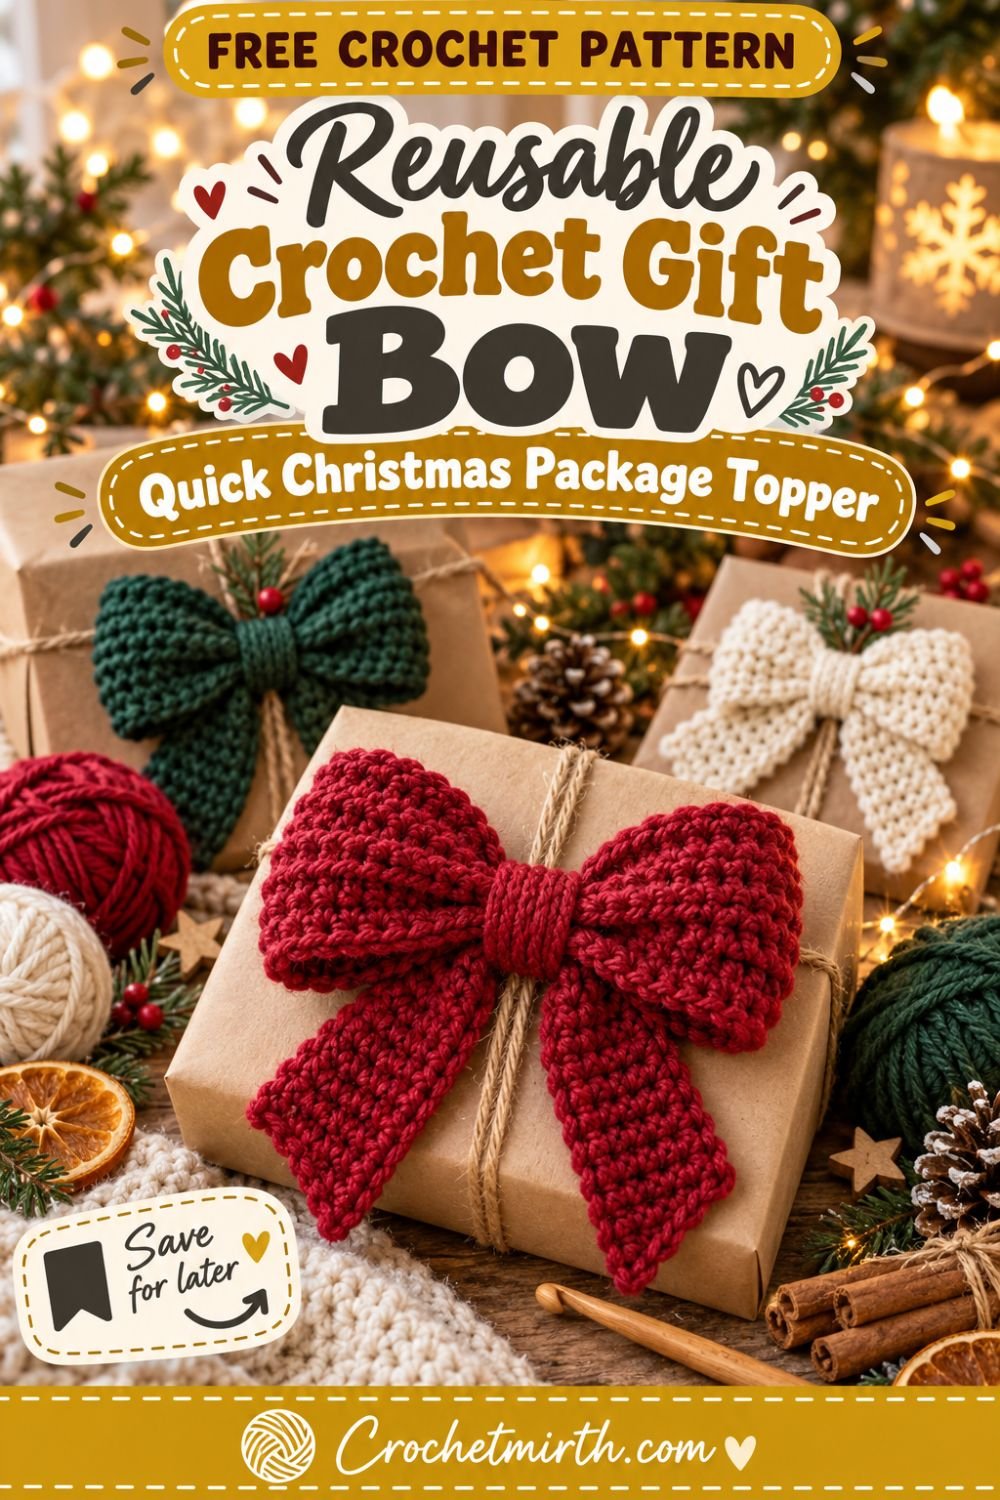
The finished bow has two softly structured loops, two short pointed tails, a ribbed center wrap, and a removable crochet cord hidden at the back.
Tie it onto a Christmas package.
Give the present.
Then remove the bow instead of throwing it away.
It can be reused on another gift, attached to a gift bag, added to a Christmas wreath, or hung on the tree.
And unlike the oversized Christmas tree topper pattern, this bow is intentionally compact.
The finished topper measures approximately:
5½–6 inches wide
with tails approximately:
4–5 inches long.
That makes it large enough to stand out on a wrapped present without overwhelming the package.
Why You’ll Love This Crochet Gift Bow
This pattern is:
- Quick to crochet
- Beginner-friendly
- Reusable
- Great for scrap yarn
- Made from simple pieces
- Easy to batch-make
- Perfect for Christmas packages
- Customizable in any color
- Removable from the gift
- Useful as decor after the present is opened
It’s also a lovely way to add something handmade to a purchased gift.
Skill Level
Easy / Advanced Beginner
You should know how to:
- Chain
- Half double crochet
- Single crochet
- Work in the back loop only
- Make a basic decrease
- Slip stitch
- Sew crochet pieces together
- Fasten off
- Weave in ends
The pattern doesn’t require working in the round.
Materials
Use approximately:
55–75 yards of Category 4 worsted or Aran-weight yarn
for one finished bow, including the attachment cord.
For the sample:
Deep cranberry red
creates a classic Christmas look.
You’ll also need:
- 4.5 mm crochet hook
- Yarn needle
- Scissors
- Measuring tape
- Stitch markers, optional
Best Yarn
Choose yarn with enough structure to hold the loops.
Good options include:
- Worsted cotton
- Cotton/acrylic blend
- Firm acrylic
- Wool/acrylic blend
Very soft or silky yarn can make the loops collapse.
Crochet Abbreviations
This pattern uses US crochet terminology.
ch – chain
sc – single crochet
hdc – half double crochet
hdc2tog – half double crochet two together
sl st – slip stitch
st / sts – stitch / stitches
BLO – back loop only
Finished Measurements
Approximately:
Bow width: 5½–6 inches
Bow height without tails: 2–2½ inches
Tail length: 4–5 inches
Overall height: approximately 6 inches
These dimensions work well for many medium Christmas packages.
Gauge
Approximate gauge:
14 hdc = 4 inches
10 rows = 4 inches
Gauge doesn’t need to be exact.
For this project, structure is more important than precise sizing.
Construction Overview
The bow uses four simple components:
- One long strip that becomes both loops
- Two short tapered tails
- One ribbed center wrap
- One removable package cord
The long strip is joined into a ring.
The ring is flattened and pinched in the middle.
The two tails sit behind it.
Then the center band wraps around all the layers.
This creates a dimensional bow without stuffing or complicated shaping.
PART 1: CROCHET THE BOW STRIP
Using cranberry yarn:
Ch 43.
Row 1
Hdc in the second chain from the hook.
Hdc across.
42 sts
Ch 1 and turn.
Row 2
Working in the:
back loop only
Hdc across.
42 sts
Ch 1 and turn.
Rows 3–5
Repeat Row 2.
At the end, you’ll have a long rectangle approximately:
12 inches long
and roughly:
2 inches wide.
Fasten off, leaving a long sewing tail.
PART 2: CREATE THE TWO BOW LOOPS
Bring the two short ends of the rectangle together.
Sew them securely.
You now have one crochet ring.
Turn the seam toward the back.
Flatten the ring on your work surface.
Position the seam at the exact center of the back layer.
The flattened ring should measure approximately:
6 inches across.
Pinch the Center
Pinch the middle of the flattened ring.
Create a gentle accordion fold:
Bring the top edge slightly downward.
Bring the bottom edge slightly upward.
Pinch everything together.
The left and right sides should puff naturally into:
two rounded bow loops.
Use a temporary piece of scrap yarn to hold the center if necessary.
Set aside.
PART 3: MAKE THE FIRST TAIL
Using the same yarn:
Ch 8.
Tail Row 1
Hdc in the second chain from the hook.
Hdc across.
7 sts
Ch 1 and turn.
Rows 2–8
Hdc BLO across.
7 sts
Ch 1 and turn.
Begin the Taper
Row 9
Hdc2tog.
Hdc in the next 3 sts.
Hdc2tog.
5 sts
Ch 1 and turn.
Row 10
Hdc across.
5 sts
Ch 1 and turn.
Row 11
Hdc2tog.
Hdc in next st.
Hdc2tog.
3 sts
Ch 1 and turn.
Row 12
Hdc across.
3 sts
Ch 1 and turn.
Row 13
Decrease the final 3 stitches neatly together.
Fasten off.
You now have one short pointed crochet tail.
PART 4: MAKE THE SECOND TAIL
Repeat the same instructions.
You should now have:
2 matching tails.
Each should measure approximately:
4–5 inches long.
Optional Asymmetrical Tails
For a more natural handmade appearance, make the second tail:
1–2 rows longer
before beginning the decreases.
Slightly different tail lengths can make the finished bow look more like naturally tied ribbon.
PART 5: POSITION THE TAILS
Lay the two tails flat.
Place their upper edges beside one another.
Angle them slightly outward to create a soft:
V shape.
The pointed ends should move away from each other.
Place the Bow Loops Above Them
Position the pinched bow body on top of the tail ends.
The upper ends of the tails should disappear behind the center.
Check that the bow is balanced before sewing anything permanently.
PART 6: MAKE THE CENTER WRAP
Using cranberry yarn:
Ch 6.
Row 1
Sc in the second chain from the hook.
Sc across.
5 sts
Ch 1 and turn.
Row 2
Working in the:
back loop only
Sc across.
5 sts
Ch 1 and turn.
Continue
Repeat Row 2 until the band measures approximately:
5–5½ inches long.
Fasten off, leaving a long sewing tail.
Wrap the Center
Place one end of the ribbed band at the back of the bow.
Wrap it snugly around:
- Front bow layer
- Back bow layer
- Tail 1
- Tail 2
Bring the band ends together at the back.
Sew securely.
The center wrap should hold all four sections without needing additional visible stitches across the front.
Shape the Bow
Pull both loops outward.
Use your fingers to gently open them.
Adjust the tails.
The bow should look full but still relatively flat enough to sit neatly on a gift box.
PART 7: MAKE THE REUSABLE PACKAGE CORD
This is what makes the topper easy to remove and reuse.
Using matching or contrast yarn:
Ch 100–110.
The exact number isn’t important.
Aim for a cord approximately:
26–30 inches long.
Strengthen the Cord
Starting in the second chain from the hook:
Sl st back through every chain.
This creates a stronger, rounder cord.
Fasten off.
Attach the Cord Without Sewing It Permanently
Turn your bow over.
Slide the finished cord underneath the center wrap at the back.
Center it so both cord ends are approximately equal.
Do not sew the cord to the bow.
This allows you to:
- Pull it out
- Replace it
- Change its length
- Use the bow without the cord
Attach the Bow to a Gift Box
Place the crochet bow on top of the wrapped present.
Run the two cord ends around the box.
Tie them securely underneath.
For larger boxes, make the cord longer.
Use It With Existing Twine
Another easy option:
Wrap the gift normally with:
- Twine
- Ribbon
- Crochet chain
Then use the shorter bow cord to tie the crochet bow onto the crossing point.
This makes removal especially easy.
Why No Glue?
Glue can make the yarn stiff and often turns the bow into a one-use decoration.
The hidden cord keeps the topper removable.
That is the key feature of this version.
Your Reusable Crochet Gift Bow Is Finished
You should now have:
- Two dimensional loops
- Two tapered tails
- Ribbed center wrap
- Hidden removable cord
- Compact gift-friendly proportions
Classic Cranberry Bow
Cranberry looks especially beautiful against:
- Kraft paper
- Cream wrapping paper
- Forest-green paper
- Natural twine
Forest Green Bow
Use deep forest green on:
- Cream gifts
- Kraft packages
- Cranberry wrapping
Add a cream cord for subtle contrast.
Cream Crochet Bow
Warm cream creates a softer minimalist topper.
Pair it with:
- Brown kraft paper
- Evergreen sprig
- Dried orange slice
Mustard-Gold Bow
Muted mustard gives you the appearance of gold without using shiny synthetic ribbon.
It pairs beautifully with forest green and cream.
Burgundy Bow
Deep burgundy creates a more elegant traditional Christmas gift.
Combine with:
- Cream paper
- Gold-colored tag
- Evergreen
Sage Green Bow
Soft sage works well for:
- Neutral Christmas
- Scandinavian gift wrapping
- Modern farmhouse holiday decor
Make a Two-Color Bow
Use one color for the main loops.
Make the center wrap in another color.
For example:
Cranberry loops + cream center
Forest-green loops + mustard center
Cream loops + cranberry center
Contrast Tails
Make the loops cranberry.
Make both tails:
warm cream.
Use cranberry again for the center.
This creates stronger visual separation.
Add Metallic Yarn
Hold a very thin metallic thread together with the main yarn only while making the center wrap.
This gives the bow a tiny festive sparkle without overpowering the handmade texture.
Mini Gift Bow
For smaller boxes or gift cards:
Start the bow strip with approximately:
Ch 29–31
instead of Ch 43.
Make the tails only:
3 inches long.
The finished bow will be approximately:
4 inches wide.
Large Package Bow
For a large gift:
Make the loop strip approximately:
16–18 inches long
before joining it into a ring.
Increase the tail length to:
6–7 inches.
This produces a wider statement bow without approaching tree-topper size.
Make a Bow Without Tails
You can skip the two tail pieces entirely.
Make:
- Loop strip
- Center band
- Attachment cord
This creates a clean classic package bow.
Make Several Matching Bows
For coordinated Christmas wrapping, make:
- 2 cranberry
- 2 forest green
- 2 cream
- 1 mustard
Use the same wrapping paper throughout.
The different crochet colors add variety without making your gift pile look chaotic.
Scrap-Yarn Project
This is especially useful for leftover worsted yarn.
Save small amounts remaining from:
- Hats
- Scarves
- Stockings
- Gift bags
- Christmas ornaments
You don’t need a complete skein.
Quick crochet bows are commonly promoted as useful small projects for leftover yarn and gift wrapping because of their low material requirements. Katy Craft Ideas
Reusable Gift-Wrapping Set
Pair this bow with your:
Crochet Christmas Gift Bag Pattern
Instead of tying the bow around a box, attach it to the drawstring.
After the present is opened, both pieces can be reused.
Bow + Gift Card Holder
Use a mini version of this bow on your:
Crochet Gift Card Holder Envelope.
Make the bow approximately:
2½–3 inches wide.
Sew it permanently onto one corner only if you don’t need it to remain removable.
Bow + Stocking Gift
Attach the topper to a packaged:
- Crochet beanie
- Scarf
- Mittens
- Ear warmer
This helps visually connect several patterns from your winter gift content cluster.
Christmas Package Styling
For a Pinterest-friendly package, combine:
Kraft paper + cranberry crochet bow + evergreen
or:
Cream paper + forest-green bow + wooden tag.
Keep the package itself simple so the crochet bow remains the focal point.
Turn It Into an Ornament
After the gift is opened, remove the package cord.
Replace it with a shorter hanging loop.
The bow can then hang on:
- Christmas tree
- Wreath
- Garland
- Cabinet knob
Current reusable crochet bow patterns are also explicitly marketed as gift toppers that can later become hanging ornaments or seasonal decorations. Etsy
Wreath Accent
Tie the bow onto a small evergreen wreath.
Because the cord is removable, the bow doesn’t have to be permanently attached.
Garland Decoration
Attach several bows along:
- Evergreen garland
- Crochet chain
- Staircase greenery
This also pairs naturally with your existing Crochet Bow Garland Pattern.
Place Setting Bow
Make a smaller version.
Tie it around a rolled cloth napkin.
Guests can take the bow home after dinner.
Wine-Free Hostess Gift Styling
Attach a bow to a basket containing:
- Coffee
- Tea
- Cookies
- Candle
- Handmade crochet item
It adds handmade presentation without disposable plastic bows.
Why This Bow Is Different From the Bow Garland
Your garland uses multiple small repeated bows connected together.
This pattern is designed as:
one independent removable package topper.
The construction, size, tails, and attachment cord all serve a different purpose.
Why It’s Different From the Tree Topper
The oversized tree topper is approximately:
15–16 inches wide
with tails around:
18–20 inches long.
This package bow is only around:
6 inches wide.
That distinction is important both visually and for SEO.
Best Yarn for Crochet Gift Bows
Cotton
Cotton is excellent because it produces:
- Firm loops
- Sharp edges
- Strong tails
- Crisp stitch definition
Acrylic
Acrylic is:
- Affordable
- Lightweight
- Widely available
- Easy to find in Christmas colors
Choose a yarn with reasonable structure.
Wool Blend
A wool blend creates a softer premium appearance.
Light blocking can help maintain the loop shape.
Avoid Super Bulky Yarn
For this package-sized version, super bulky yarn may make the center excessively thick.
Worsted yarn keeps the bow:
- Visible
- Lightweight
- Easy to tie
- Easy to store
Make the Bow Firmer
If your loops collapse:
Try:
- Smaller crochet hook
- Cotton yarn
- Firmer tension
- Light blocking
A tiny amount of fabric stiffener can also be used for purely decorative bows if suitable for your yarn.
Don’t Stuff the Loops
The bow doesn’t need stuffing.
Keeping the loops hollow makes the topper:
- Lighter
- Easier to flatten for storage
- Easier to reuse
- Better suited to packages
Blocking
Before assembly, lightly block:
- Main loop strip
- Both tails
Straighten the edges and sharpen the tail points.
Let everything dry completely.
Then assemble the bow.
Batch-Making Christmas Bows
If you’re making many bows, work assembly-line style.
First crochet all loop strips.
Then make all tails.
Then make all center wraps.
Finally assemble everything.
Add package cords only when you know which presents each bow will decorate.
Five-Bow Christmas Set
A simple coordinated set could include:
- Cranberry
- Forest green
- Cream
- Mustard
- Burgundy
Store them together after Christmas and reuse them next year.
Storage
Remove the bow from the package.
Untie or pull out the attachment cord.
Gently flatten the loops without sharply creasing them.
Store the bows in a shallow box.
Avoid placing heavy objects on top.
Washing
Wash only if necessary and follow the yarn label.
Reshape both loops and tails while damp.
Allow the bow to dry fully before storing or attaching it to paper wrapping.
Common Beginner Mistakes
Uneven Loops
Center the seam at the back before pinching the bow.
If the seam moves toward one side, one loop will look smaller.
Center Wrap Too Loose
The center band must firmly hold the folds together.
Center Wrap Too Tight
If you pull excessively, the loops may become narrow and distorted.
Tails Pointing Straight Down
Angle them slightly outward during assembly for a more natural ribbon appearance.
Attachment Cord Too Short
Measure the package before crocheting the cord.
You can make it as long as necessary.
Bow Sliding on the Box
Tie the cord firmly or attach the bow at the intersection of existing gift twine.
Loops Look Flat
Insert your fingers into each loop and gently round the fabric after attaching the bow.
Frequently Asked Questions
How big is the finished bow?
Approximately 5½–6 inches wide with 4–5 inch tails.
What yarn weight is used?
Category 4 worsted or Aran-weight yarn.
What hook size is used?
4.5 mm.
How much yarn do I need?
Approximately 55–75 yards.
Is it reusable?
Yes. The hidden cord allows the bow to be removed from the package instead of being glued down.
Does the bow require stuffing?
No.
Does it require wire?
No.
Can beginners make it?
Yes. Most pieces are simple rectangles or slightly tapered panels.
Can I make it smaller?
Yes. Shorten the main strip and tails.
Can it become an ornament?
Yes. Replace the package cord with a small hanging loop.
Can I use leftover yarn?
Absolutely. This is an excellent scrap-yarn Christmas project.
Final Thoughts
A reusable crochet bow is a small project, but it can completely change the look of a Christmas gift.
This crochet bow gift topper pattern uses one simple loop strip, two short tapered tails, a ribbed center wrap, and a hidden removable cord to create a package bow you don’t have to throw away when the gift is opened.
Make cranberry bows for traditional Christmas wrapping.
Try forest green with cream paper.
Use warm cream for neutral packages.
Or crochet several colors and bring them back every December.
The project is fast, requires relatively little yarn, and adds a genuine handmade element even when the present inside isn’t handmade.
Save this reusable crochet Christmas package bow pattern for your holiday project list!