Crochet Christmas Bell Ornament Pattern – Easy Gold Bell Decoration
A little golden bell can add just the right amount of handmade charm to a Christmas tree.

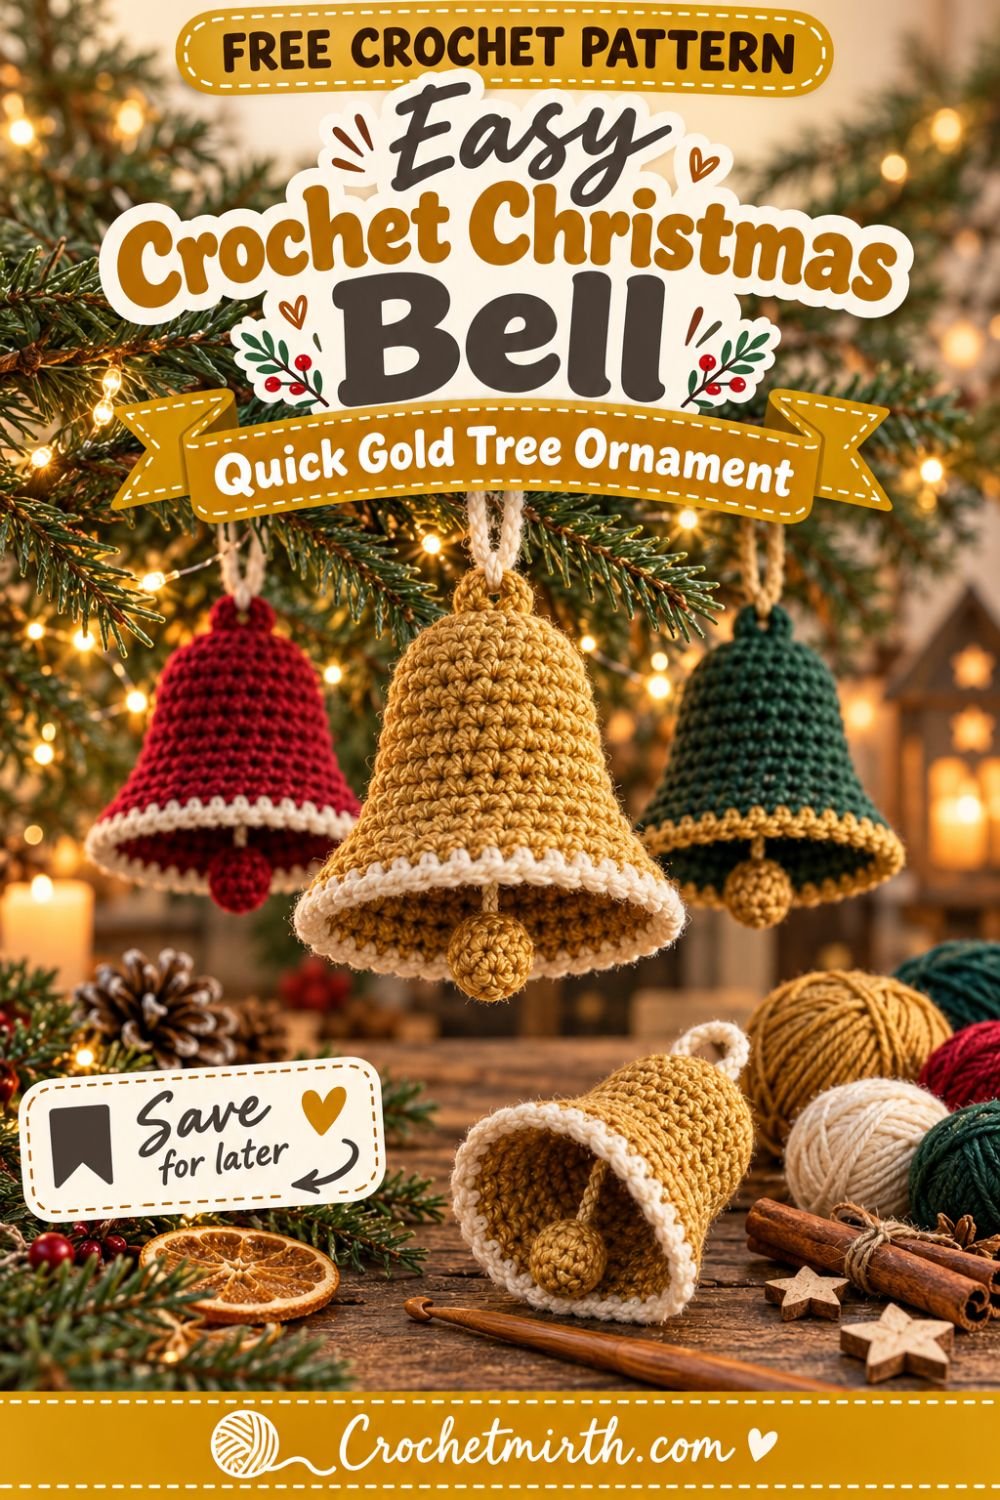
This crochet Christmas bell ornament pattern creates a small three-dimensional bell with a rounded top, gently widening body, flared bottom edge, hanging loop, and tiny crochet clapper.
It’s designed to look like an actual bell rather than a flat appliqué.
And because each ornament requires only a small amount of yarn, it’s a great project for using leftover Christmas colors.
Make one in antique gold for a traditional look, or crochet an entire collection in cranberry, forest green, cream, and mustard.
Finished bells can decorate Christmas trees, wreaths, garlands, packages, holiday branches, or handmade gift sets.
Why You’ll Love This Crochet Bell
The bell is worked almost entirely in the round, requires very little yarn, needs no stuffing in the main body, and is small enough to finish quickly.
The gradual increases create the bell shape automatically, while the final wider rounds create the characteristic flared rim.
The small crochet clapper is made separately and attached inside.
Skill Level
Easy / Advanced Beginner
You’ll need to know magic ring, chain, single crochet, half double crochet, increase, decrease, back-loop crochet, slip stitch, and working in joined rounds.
A recently published 2026 Christmas bell design also categorizes this general type of three-dimensional ornament as an Easy project using worsted yarn and a 4 mm hook. crochetsprout.com
Materials
- 30–40 yards Category 4 worsted-weight yarn in antique gold or mustard
- About 5 yards warm-cream yarn for the optional contrast rim and loop
- 4.0 mm crochet hook
- Yarn needle
- Scissors
- Stitch marker
- Tiny amount of fiberfill for the clapper only, optional
Smooth cotton, cotton-blend, or acrylic yarn works particularly well because it keeps the bell shape visible.
Finished Size
Using worsted yarn and a 4 mm hook, aim for approximately 4 inches tall excluding the hanging loop and 3½ inches across the widest part of the rim.
Other bell patterns vary considerably by yarn choice; for example, one worsted design finishes around 3 inches tall and uses roughly 24–30 yards, while a newer worsted version finishes around 4½ inches tall. Ravelry
Abbreviations
This pattern uses US crochet terminology. ch means chain, sc single crochet, hdc half double crochet, inc two stitches in the same stitch, dec single crochet two together, sl st slip stitch, BLO back loop only, and st/sts stitch/stitches.
PART 1: Crochet the Bell Crown
Using antique-gold yarn, make a magic ring.
Round 1
Work 6 sc into the magic ring.
Pull closed and join with a sl st.
6 sts
Round 2
Work 2 sc in every stitch around.
Join.
12 sts
Round 3
Working in the back loop only, sc in every stitch around.
Join.
12 sts
This BLO round creates a subtle change in direction and helps define the rounded crown.
Round 4
Repeat:
sc in next st, 2 sc in next st
around.
Join.
18 sts
PART 2: Build the Bell Body
Rounds 5–8
Sc in every stitch around.
Join after each round.
18 sts
Your crochet piece should now look like a small narrow cup.
Do not stuff it.
A real decorative bell needs the interior to remain hollow.
PART 3: Begin the Flare
Round 9
Repeat:
sc in next 2 sts, 2 sc in next st
around.
Join.
24 sts
Round 10
Sc around.
24 sts
Round 11
Repeat:
sc in next 3 sts, 2 sc in next st
around.
Join.
30 sts
The lower body should now begin widening noticeably.
PART 4: Shape the Bell Rim
Round 12
Hdc in every stitch around.
30 sts
The slightly taller HDC stitches help the bottom edge open outward.
Round 13
Repeat around:
sc in next 2 sts, 2 hdc in next st, sc in next 2 sts
Repeat the sequence six times.
You finish with:
36 sts
This final increase creates the wider bell-shaped rim.
PART 5: Add the Cream Edge
Change to warm-cream yarn.
Work:
1 sc in every stitch around
for a total of:
36 sc
Join and fasten off.
This narrow contrasting edge helps define the flared bell opening.
For an all-gold ornament, simply continue with the main color instead.
Check the Bell Shape
Place the ornament upright on your work surface.
You should see a narrow rounded top, straight-to-gently-widening middle, and clearly flared lower edge.
If the rim curls upward slightly, shape it outward with your fingers.
Light blocking can improve the silhouette.
PART 6: Make the Crochet Clapper
Using gold yarn, make a magic ring.
Clapper Round 1
Work:
6 sc
into the ring.
Round 2
Work:
2 sc in each stitch
around.
12 sts
Round 3
Sc around.
12 sts
If desired, place a tiny pinch of fiberfill inside.
Round 4
Work:
dec around
six times.
6 sts
Fasten off, leaving a long tail.
Pull the remaining opening closed.
You now have a tiny crochet ball.
Make the Clapper Cord
With gold yarn:
Ch 8.
Starting in the second chain from the hook, sl st back along the chain.
This creates a short firm crochet cord.
Attach one end securely to the little clapper.
Attach the Clapper Inside the Bell
Thread the opposite end of the cord through your yarn needle.
Sew it securely to the inside center of the bell crown.
Adjust the length so the clapper hangs just slightly below the rim.
It should be visible but shouldn’t hang dramatically below the bell.
A suspended clapper is also used in existing Christmas bell ornament designs to strengthen the recognizable bell appearance. Ravelry
PART 7: Add the Hanging Loop
Using warm-cream or gold yarn, join at the top of the bell.
Ch 20.
Form a loop and sl st securely back into the crown.
Fasten off.
Weave the yarn tail through several nearby stitches.
The loop should be large enough to hang easily over a Christmas tree branch.
Your Gold Christmas Bell Is Finished
Gently shape the ornament with your fingers.
Pull the flared rim outward slightly and center the hanging loop.
The bell should remain hollow and lightweight.
Optional Small Crochet Bow
Want an even more festive version?
Make a tiny cranberry bow and sew it directly beneath the hanging loop.
Keep it small so it doesn’t cover the bell silhouette.
A bow approximately 1½–2 inches wide is enough.
Antique Gold Version
For the Pinterest sample, I recommend an antique-gold or muted mustard rather than very bright yellow.
Against evergreen branches, this gives the appearance of a classic golden Christmas bell while maintaining the warm Crochetmirth palette.
Metallic Gold Version
You can also hold a fine metallic gold thread together with your main yarn.
This adds subtle sparkle without requiring a fully metallic yarn, which can sometimes be stiff or uncomfortable to crochet.
Cranberry Bell
Make the body in muted cranberry and finish the edge in cream.
This coordinates beautifully with your Christmas stocking, bow, and gift-bag patterns.
Forest Green Bell
A forest-green body with muted-gold edging creates a darker woodland Christmas ornament.
Cream Bell
Warm cream with a mustard-gold rim works especially well for neutral or Scandinavian Christmas decor.
Make a Set of Five Bells
A coordinated collection could use two gold bells, one cranberry bell, one forest-green bell, and one cream bell.
Keep the hanging loops the same color to make the set feel intentional.
Crochet Bell Garland
Instead of hanging each bell individually, crochet several and attach them to a long cream chain.
Space the bells roughly 8–12 inches apart.
Alternate gold, cranberry, cream, and forest green.
Because these ornaments are hollow and lightweight, they work especially well for a garland.
Christmas Wreath Decoration
Make three gold bells and group them together near the bottom of an evergreen wreath.
Add a cranberry crochet bow above them.
This creates a classic bells-and-bow Christmas motif.
Gift Topper
Tie one bell onto a Christmas gift using its hanging loop.
After opening the present, the recipient can transfer the ornament directly to the Christmas tree.
Place Setting
Place one small bell beside each napkin at Christmas dinner.
Add a kraft-paper name tag to the hanging loop.
Guests can take the ornament home afterward.
Scrap-Yarn Project
Crochet bells need relatively little material. Existing patterns range from around 8–10 yards for small DK versions to roughly 24–30 yards for larger worsted bells. Ravelry
That makes this an excellent project for small leftovers from larger Christmas makes.
Make a Smaller Bell
Use DK yarn with a 3–3.5 mm hook.
Keep the same basic shaping.
Your ornament should become lighter and smaller.
A current DK Christmas bell design using a 3.5 mm hook needs only about 8–10 yards. Ravelry
Make a Mini Bell
Use sport-weight yarn or crochet thread.
These tiny versions work well for garlands, gift tags, miniature trees, or sets of ornaments.
Make a Larger Bell
Use Category 5 bulky yarn and an appropriately larger hook.
The same shaping idea can become a bigger mantel or wreath decoration.
For a Christmas tree, however, avoid making the bell so large or heavy that it bends the branches.
Firming the Bell
If your yarn is very soft and the bell collapses, light stiffening can help.
First try simply wet-blocking the bell around a small cup or rounded form.
Let it dry completely.
If more structure is needed for purely decorative use, a suitable fabric stiffener can be applied according to its instructions.
Stiffening is also suggested for some existing crochet bell ornaments when a crisper finished silhouette is desired. Ravelry
Why the Bell Is Not Stuffed
Stuffing the main bell would turn it into a solid amigurumi shape.
Leaving the inside empty provides the recognizable hollow opening and lets the little clapper remain visible.
Only the clapper may receive a tiny amount of stuffing.
Common Beginner Problems
If the bell looks cylindrical rather than flared, double-check the increases in Rounds 9, 11, and 13.
If the rim ruffles dramatically, your tension may be very loose or you may have added extra stitches.
If the clapper hangs too low, shorten the cord before securing it permanently.
If the hanging loop leans to one side, reattach it at the true center of the crown.
If the bottom curls inward, lightly dampen and shape the rim outward while drying.
Frequently Asked Questions
Is this ornament three-dimensional?
Yes. It is a hollow 3D bell worked from the top down.
What yarn weight is used?
Category 4 worsted-weight yarn.
What hook size is used?
4.0 mm.
How large is the finished bell?
Approximately 4 inches tall and 3½ inches across the rim.
How much yarn do I need?
Approximately 30–40 yards plus a small amount for the contrast edge.
Does it need stuffing?
The bell does not. Only the small clapper may be lightly stuffed.
Does it contain a real jingle bell?
No. The written pattern uses a crochet clapper, although a small craft jingle bell can be substituted if desired.
Can beginners make it?
Yes. A confident beginner comfortable working in rounds should be able to follow it.
Can I make several for a garland?
Absolutely. The lightweight construction is ideal for garlands.
Can I use cotton yarn?
Yes. Cotton is particularly good when you want a crisp bell shape.
Final Thoughts
A crochet bell is one of those small projects that immediately feels like Christmas.
This crochet Christmas bell ornament pattern begins with a narrow rounded crown, gradually widens through the body, and finishes with a flared edge that creates the recognizable bell silhouette.
Add the tiny crochet clapper and hanging loop, and a simple handful of yarn becomes a finished ornament ready for the Christmas tree.
Make it in antique gold for a classic bell, cranberry and cream for traditional Christmas color, or crochet an entire mixed set for a handmade ornament collection.
Save this easy gold crochet Christmas bell pattern for your holiday project list!