Alpine Stitch Crochet Beanie Pattern – Cozy Adult Winter Hat
Texture can completely transform a simple crochet hat.

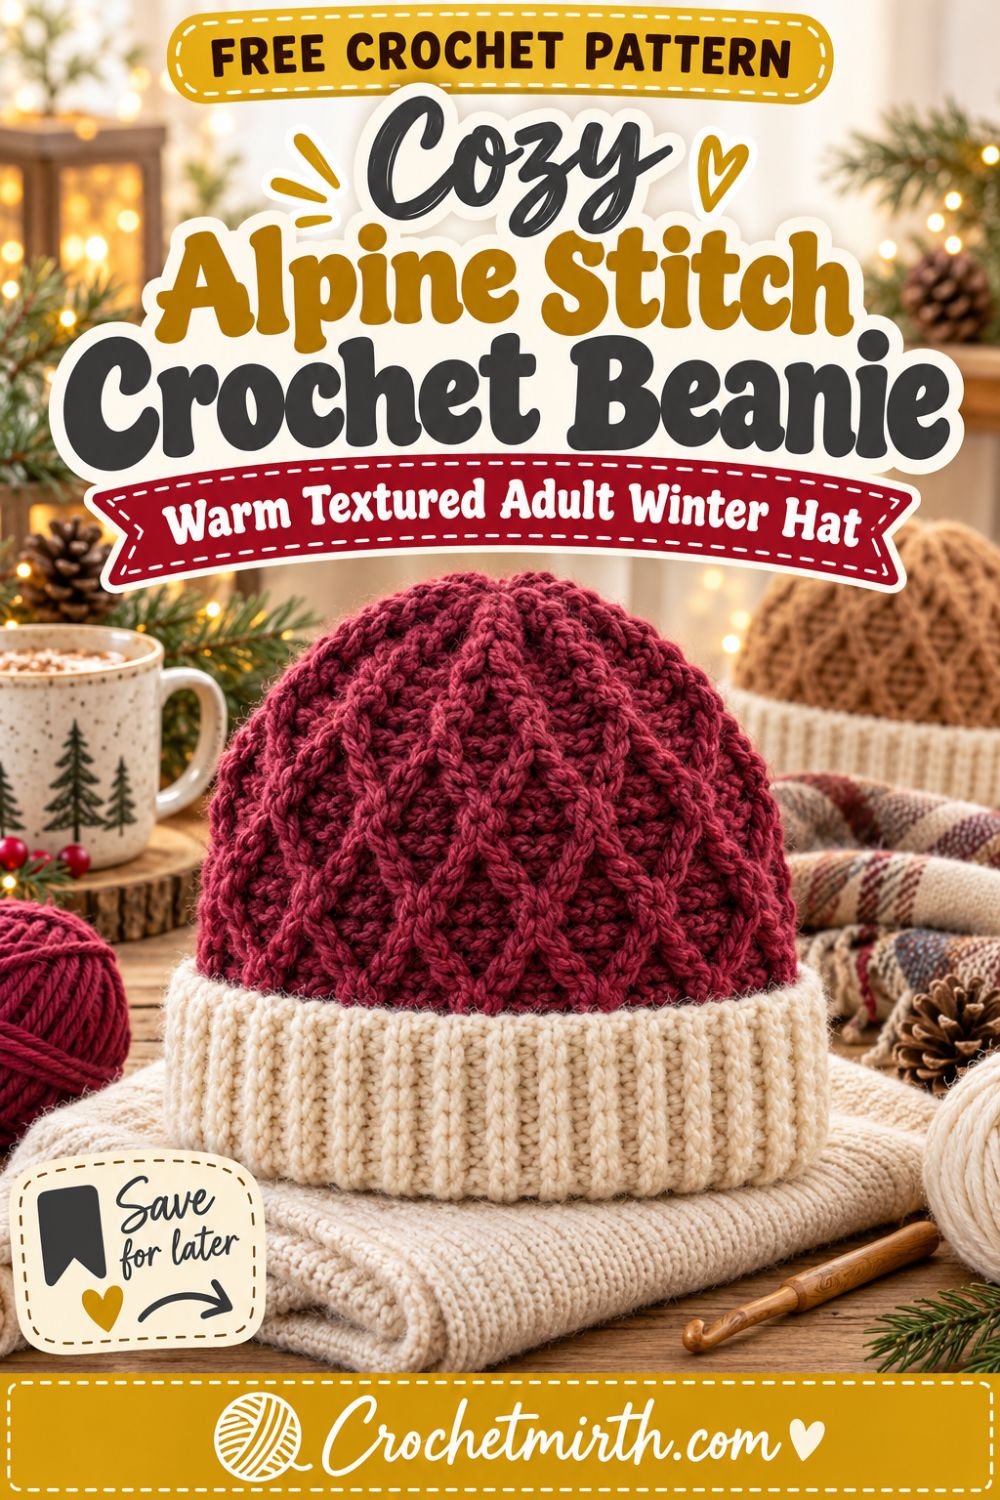
This Alpine stitch crochet beanie pattern uses raised front-post stitches to create a richly textured winter hat while keeping the overall shape classic and wearable.
The beanie begins with a wide ribbed band worked in single crochet through the back loop.
The brim is folded in half for extra warmth around the ears.
The Alpine stitch body is then worked directly around the cuff using alternating double crochet, single crochet, and front-post double crochet rounds.
Finally, simple decrease rounds create a clean rounded crown.
The sample combines a deep cranberry Alpine body with a warm-cream brim, giving the raised texture enough contrast to stand out beautifully.
Why You’ll Love This Alpine Stitch Beanie
This hat features a deep three-dimensional crochet texture without complicated cables.
The finished design includes:
- True Alpine stitch texture
- Warm worsted-weight yarn
- Wide doubled ribbed cuff
- Classic fitted adult shape
- Closed rounded crown
- No complicated assembly
- Unisex styling
- Easy color customization
- Optional pom-pom
- Excellent handmade-gift potential
It also looks very different from a waffle stitch beanie because Alpine stitch creates staggered raised posts rather than repeating square recesses.
Skill Level
Advanced Beginner / Intermediate
You should know how to:
- Chain
- Single crochet
- Single crochet in the back loop
- Double crochet
- Front post double crochet
- Single crochet two together
- Slip stitch
- Work joined rounds
- Sew a short ribbing seam
The Alpine stitch becomes very repetitive after the first few rounds.
Materials
Use approximately:
220–270 yards Category 4 worsted-weight yarn
for the adult beanie with folded cuff.
For the sample:
Main Color: deep cranberry / mulberry
Contrast Color: warm cream
Approximate amounts:
150–180 yards cranberry
70–90 yards cream
You’ll also need:
- 5.0 mm crochet hook
- 4.5 mm crochet hook
- Yarn needle
- Scissors
- Measuring tape
- Stitch markers
Optional:
- Removable faux-fur or yarn pom-pom
Finished Size
The written pattern fits an average adult head measuring approximately:
21–23 inches around.
Approximate unstretched hat circumference:
18–19 inches
Finished height with cuff folded:
8½–9 inches
Folded cuff depth:
about 2½ inches
The beanie uses negative ease so it stretches comfortably around the head.
Gauge
In Alpine stitch using the 5 mm hook:
Approximately:
14 stitches = 4 inches
and:
10–11 rounds = 4 inches
Gauge is important for a fitted beanie.
If your fabric is significantly wider than the sample, move down a hook size.
If it’s too narrow or very stiff, try the next larger hook.
Crochet Abbreviations
This pattern uses US terminology.
ch – chain
sc – single crochet
sc BLO – single crochet in back loop only
dc – double crochet
FPdc – front post double crochet
sc2tog – single crochet two together
sl st – slip stitch
st / sts – stitch / stitches
rnd – round
Special Stitch: Front Post Double Crochet
Yarn over.
Instead of inserting the hook into the top loops of the stitch, insert the hook from front to back and back to front around the post of the indicated double crochet.
Yarn over.
Pull up a loop.
Complete the double crochet normally.
The post is pulled toward the front of the fabric, creating the raised Alpine texture.
How Alpine Stitch Works
The stitch pattern alternates:
double-crochet texture round
then:
single-crochet round.
The front-post stitches are worked around double-crochet posts two rounds below.
On the following textured round, their positions shift by one stitch.
That alternating placement creates the characteristic staggered Alpine texture.
PART 1: Crochet the Fold-Over Ribbed Brim
Using warm-cream yarn and your:
4.5 mm hook
Ch:
21
Row 1
Sc in the second chain from the hook and across.
20 sts
Ch 1 and turn.
Row 2
Working in the:
back loop only
Sc across.
20 sts
Ch 1 and turn.
Continue
Repeat Row 2 until your strip measures approximately:
18–19 inches long.
Depending on your tension, this will usually require approximately:
72–78 rows.
Measure the actual strip rather than relying only on row count.
Test the Brim
Wrap the ribbing gently around the head.
It should stretch comfortably to fit a:
21–23 inch head
while still feeling snug.
If it feels loose before joining, remove several rows.
Join the Ribbing
Bring the two short ends together.
Make sure the strip isn’t twisted.
Slip stitch through both edges or sew them together with a yarn needle.
You now have one tall ribbed ring.
Fold the Cuff
Fold the ribbed ring in half so the two long edges meet.
Your doubled cuff should measure approximately:
2½ inches deep.
Place four stitch markers evenly around the edge.
PART 2: Attach the Main Color
Switch to the:
5.0 mm hook
and deep cranberry yarn.
Join through both layers of the folded brim.
Setup Round
Ch 1.
Work:
64 sc evenly around
through both long edges of the cuff.
Join with a sl st.
64 sts
This setup round secures the folded cuff permanently.
Important
Keep these stitches loose enough that the brim can still stretch.
The body stitch count must remain:
64 stitches
until crown shaping begins.
PART 3: Alpine Stitch Foundation
Before creating the raised posts, we need a row of double-crochet posts to work around.
Round 1
Ch 2.
Dc in every stitch around.
Join.
64 sts
The ch 2 does not count as a stitch.
Round 2
Ch 1.
Sc in every stitch around.
Join.
64 sts
Now the Alpine texture begins.
PART 4: Alpine Texture Round A
Round 3
Ch 2.
Work:
dc in next sc
Then work:
FPdc around the next dc from Round 1, directly two rounds below
Continue around repeating:
dc in next stitch, FPdc around the next corresponding dc two rounds below
Join.
64 sts
You should have:
32 ordinary dc
and:
32 raised FPdc
alternating around the hat.
Round 4
Ch 1.
Sc in every stitch around.
Join.
64 sts
This plain single-crochet round creates the recessed horizontal spacing characteristic of Alpine stitch.
PART 5: Alpine Texture Round B
The raised stitches now shift one position.
Round 5
Ch 2.
Work:
FPdc around the first corresponding dc/post two rounds below
Then:
dc in next stitch
Continue around repeating:
FPdc, dc
Join.
64 sts
Because the post placement has shifted, the raised stitches now sit between the raised stitches from Round 3.
Round 6
Ch 1.
Sc around.
Join.
64 sts
Alpine Repeat
From now on, repeat:
Rounds 3–6
maintaining the alternating placement of the raised posts.
Continue until the Alpine section measures approximately:
4½–5 inches above the folded brim.
For most crocheters, this will be around:
12–14 body rounds after the foundation rounds.
Always prioritize the finished measurement rather than an exact number of rounds.
Check the Texture
You should see:
- Raised vertical post stitches
- Staggered placement
- Recessed single-crochet rows
- Small diamond-like textured sections
If all the post stitches form straight vertical columns without shifting, you haven’t offset Round B correctly.
Check the Hat Height
Before beginning the crown, measure from the lower edge of the folded cuff.
Aim for approximately:
7–7½ inches total height.
The remaining decrease rounds will add the final crown height.
PART 6: Prepare the Crown
Finish on a:
single-crochet round.
From this point onward, stop the Alpine stitch.
We’ll shape the crown in single crochet so it closes smoothly without adding too much height.
You should have:
64 sts.
PART 7: Crown Decreases
Decrease Round 1
Repeat:
sc in next 6 sts, sc2tog
around.
56 sts
Decrease Round 2
Repeat:
sc in next 5 sts, sc2tog
around.
48 sts
Decrease Round 3
Repeat:
sc in next 4 sts, sc2tog
around.
40 sts
Decrease Round 4
Repeat:
sc in next 3 sts, sc2tog
around.
32 sts
Decrease Round 5
Repeat:
sc in next 2 sts, sc2tog
around.
24 sts
Decrease Round 6
Repeat:
sc in next st, sc2tog
around.
16 sts
Decrease Round 7
Sc2tog around.
8 sts
Fasten off, leaving approximately:
10–12 inches of yarn tail.
PART 8: Close the Crown
Thread the long yarn tail through a yarn needle.
Pass the needle through the front loops of all:
8 remaining stitches.
Pull firmly.
The opening should close completely.
Pass the yarn through the crown several more times to secure it.
Weave the remaining tail into the inside of the hat.
Shape the Crown
Turn the beanie right side out.
Use your fingers to smooth the decrease section.
The crown should look:
- Rounded
- Compact
- Symmetrical
rather than tall and pointed.
Your Alpine Stitch Beanie Is Finished
Fold the cream brim evenly.
Gently separate the raised post stitches with your fingers if necessary.
The texture should remain clearly visible all around the body.
Deep Cranberry Version
The Crochetmirth sample uses:
Deep cranberry / mulberry body
with:
warm-cream cuff.
Medium and rich colors are excellent for Alpine stitch because light and shadow make the raised texture easy to see.
Forest Green Version
Use deep forest green with a cream brim for a classic woodland winter look.
Warm Camel Beanie
Camel brown creates a neutral winter hat while showing the raised texture beautifully.
Pair it with an oatmeal or cream cuff.
Charcoal Version
Use charcoal gray for a classic unisex beanie.
Try a matching charcoal cuff for an all-one-color version.
Mustard Alpine Hat
Muted mustard-gold creates a particularly eye-catching textured winter hat.
Pair it with cream or camel ribbing.
Navy Version
Deep navy works beautifully for men’s and unisex winter hats.
Use a gray or oatmeal cuff if you want contrast.
One-Color Alpine Beanie
You don’t need a contrast brim.
Using one yarn throughout emphasizes the difference between:
ribbed cuff
and:
raised Alpine body.
Optional Pom-Pom
The written sample is shown without a pom-pom so the crown and Alpine texture remain fully visible.
If you’d like one, attach a:
3–4 inch yarn or faux-fur pom-pom
to the crown.
A removable pom-pom makes washing easier.
Shorter Brim Version
For a single-layer cuff:
Start with:
Ch 11
instead of Ch 21.
Work:
10 sc BLO
until the strip reaches the same required circumference.
Join it into a ring.
Do not fold.
Work the 64-stitch setup round directly along the upper edge.
This reduces yarn usage.
Deeper Folded Brim
For extra warmth around the ears:
Start with:
Ch 25
instead of Ch 21.
The finished folded cuff will measure approximately:
3 inches deep.
Slouchy Alpine Beanie
Add approximately:
2–3 additional Alpine repeat rounds
before beginning crown shaping.
Aim for an extra:
1–1½ inches of body length.
Then work the same decrease sequence.
Make It More Fitted
Begin crown shaping slightly earlier.
The final hat should still cover the ears comfortably when the cuff is folded.
Adult Size Guide
Teen / Small Adult
Head circumference:
20–21 inches
Make the brim approximately:
17½–18 inches relaxed.
Use approximately:
60 body stitches.
Adult Medium
Head circumference:
21–23 inches
Use the written:
64 stitches.
Adult Large
Head circumference:
23–24 inches
Make the brim approximately:
20 inches relaxed.
Use approximately:
68 body stitches.
For alternate stitch counts, keep the number even so the Alpine repeat works correctly.
During the crown, distribute approximately 8 decreases evenly per round until only a small opening remains.
Why Alpine Stitch Is So Textured
A normal double crochet is worked through the top loops of a stitch.
A front-post double crochet wraps around the actual vertical post of a stitch two rows below.
This pulls that post toward the front of the fabric.
By alternating the position of those raised stitches, Alpine stitch creates a repeated three-dimensional surface without using cables.
Alpine Stitch vs Waffle Stitch
Although both use post stitches, they create very different effects.
Waffle stitch forms repeated square or rectangular recesses.
Alpine stitch creates staggered raised posts with a softer diamond-like appearance.
This makes the two beanies visually distinct even when made with the same yarn weight.
Alpine Stitch vs Ribbed Beanie
A ribbed beanie usually features continuous vertical or horizontal lines.
Alpine stitch is more irregular and dimensional.
The raised stitches appear in alternating positions rather than forming uninterrupted ribs.
Best Yarn for Alpine Stitch
A smooth yarn with good stitch definition works best.
Excellent choices include:
- Worsted acrylic
- Wool/acrylic blend
- Merino blend
- Smooth wool
Avoid very fuzzy yarn because the halo can hide the raised post texture.
Yarn Color Matters
Very dark black yarn can make intricate Alpine texture difficult to photograph.
For Pinterest and stitch visibility, medium or rich shades usually perform better.
Good choices include:
- Cranberry
- Camel
- Sage
- Mustard
- Medium gray
- Forest green
Keep Your FPdc Loose
Front-post stitches naturally use more yarn than ordinary double crochet.
If you pull them too tightly:
- The body may shrink
- The brim may look wider than the hat
- Raised posts can distort
- The fabric may become stiff
Keep the loop height similar to your regular double crochet.
Finding the Correct Post
The FPdc is worked around the corresponding double-crochet post:
two rounds below.
Ignore the single-crochet round sitting directly beneath the current round.
Look through that row to the taller posts below it.
Use Stitch Markers
The join can make it difficult to remember where the round begins.
Place a stitch marker in the first stitch of every round.
This is particularly useful when alternating the Alpine placement.
Count Regularly
You should maintain:
64 stitches
through the entire textured body.
If you accidentally skip a stitch beside an FPdc, the texture will gradually shift and the hat may narrow.
Common Beginner Problems
Alpine Texture Doesn’t Show
Make sure you’re inserting the hook around the stitch post rather than through the top loops.
Raised Stitches Form Straight Lines
You need to offset the FPdc placement on alternating texture rounds.
Hat Gets Narrower
The post stitches may be too tight or you may be skipping the stitch corresponding to an FPdc.
Body Flares Above the Brim
Your setup stitches may be too loose or you may have too many.
The written sample uses 64.
Brim Is Too Loose
Shorten the ribbed strip before joining it.
Crown Looks Pointed
Begin decreases at the correct height and don’t insert plain rounds between decrease rounds.
Crown Opening Won’t Close
Pull the final eight loops firmly together and reinforce with several sewing passes.
Blocking
Avoid aggressive blocking because it can flatten the raised texture.
If needed:
Lightly dampen the beanie.
Shape the brim.
Round the crown.
Use your fingers to encourage the Alpine stitches forward.
Allow it to dry without stretching.
Washing
Follow the care instructions for your yarn.
If you’ve added a removable pom-pom, remove it first.
After washing, reshape the brim and raised texture while damp.
Avoid pressing or ironing the Alpine stitch.
Matching Winter Accessories
The Alpine stitch can also be used for:
- Scarf
- Cowl
- Ear warmer
- Fingerless gloves
Using the same cranberry yarn would create a coordinated winter set.
Handmade Gift Idea
This beanie works particularly well as a handmade Christmas or winter gift because it combines:
- Familiar hat shape
- Distinctive texture
- Practical warmth
- Unisex styling
Pair it with a matching scarf for a larger gift set.
Frequently Asked Questions
What yarn weight is used?
Category 4 worsted-weight yarn.
What hook sizes are used?
5 mm for the Alpine body and 4.5 mm for the ribbed cuff.
How much yarn do I need?
Approximately 220–270 yards for the adult folded-brim version.
What head size does the written pattern fit?
Approximately 21–23 inches.
What is Alpine stitch?
It’s a textured crochet stitch using alternating ordinary double crochet and front-post double crochet separated by single-crochet rows.
Is this the same as waffle stitch?
No. The post placement and finished texture are different.
Is the hat worked top down?
No. This version is worked bottom up from the ribbed cuff.
Does it need a pom-pom?
No.
Can I make it slouchy?
Yes. Add extra Alpine rounds before crown shaping.
Can an advanced beginner make it?
Yes, especially after practicing front-post double crochet on a small swatch.
Final Thoughts
Alpine stitch is an excellent choice when you want a crochet hat that feels classic but doesn’t look basic.
This Alpine stitch crochet beanie pattern combines a wide ribbed cuff with raised staggered post stitches to create a thick, cozy winter texture.
Make the deep cranberry and cream version for a rich winter look.
Choose camel or oatmeal for something neutral.
Try forest green for a woodland-style hat.
Or use charcoal and navy for classic unisex gifts.
Once you’ve completed a few Alpine repeats, the stitch pattern becomes rhythmic—and the raised texture makes the finished hat look far more complicated than it really is.
Save this cozy Alpine stitch adult beanie pattern for your winter crochet list!