Free Crochet Maple Leaf Pattern – Easy Autumn Decor
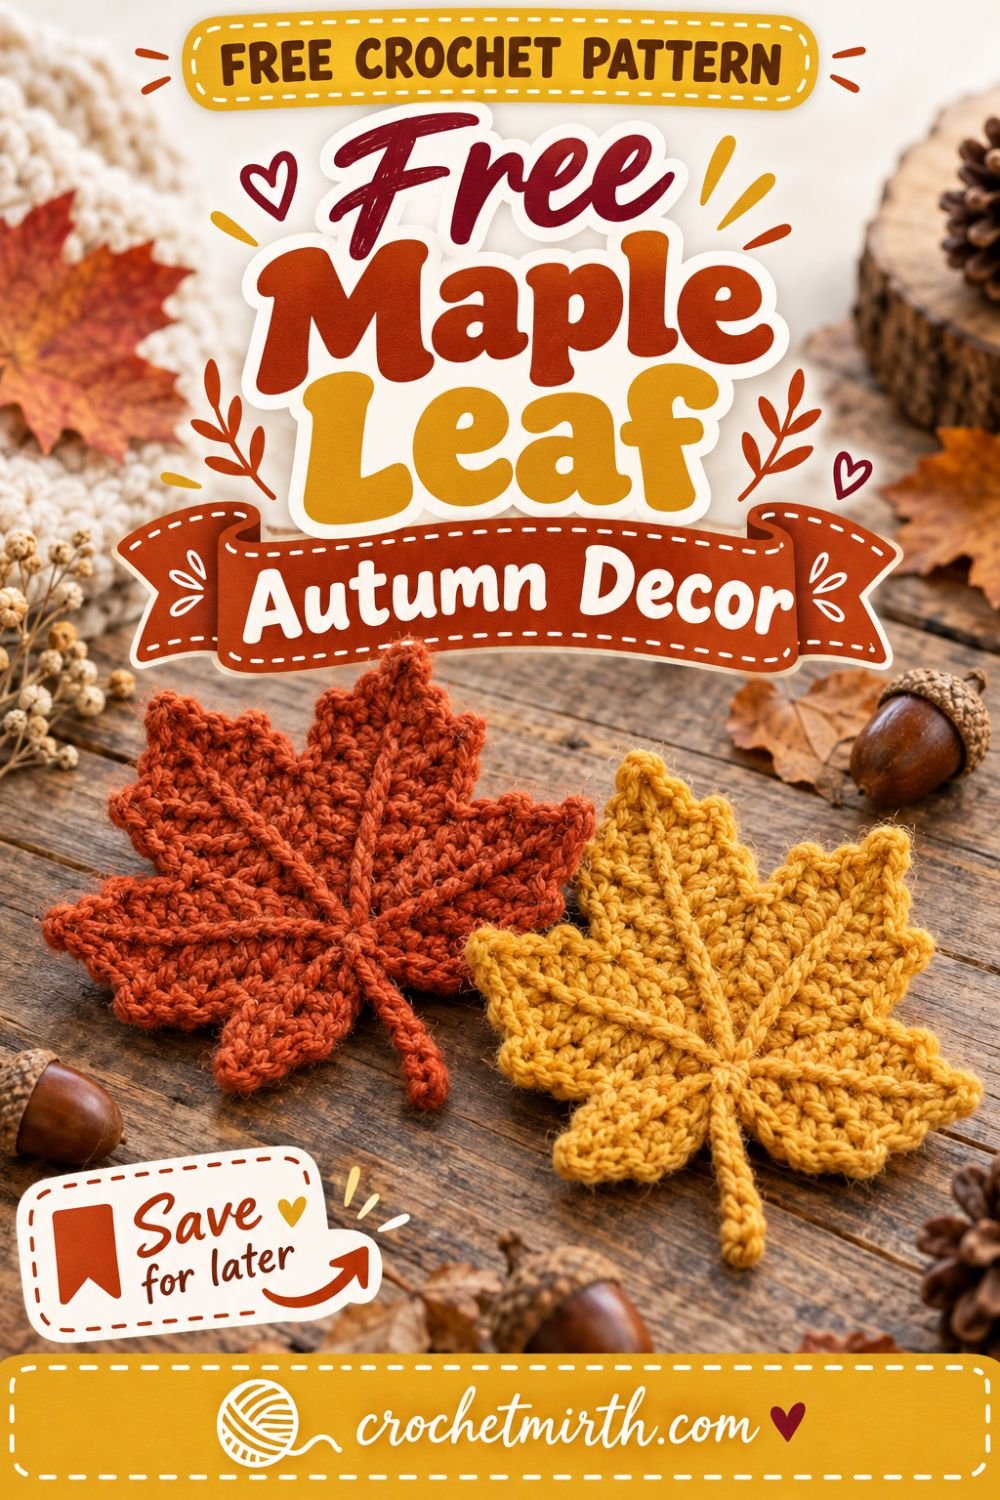
Bring the colors of fall indoors with this free crochet maple leaf pattern.
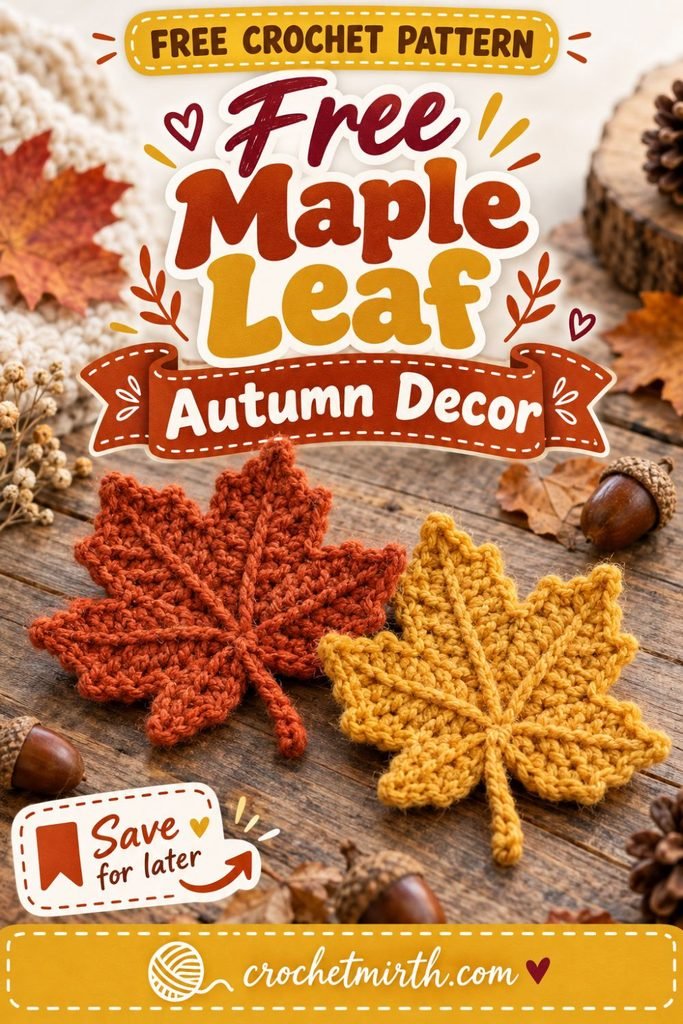
With five pointed lobes, deep little valleys, a narrow stem, and optional embroidered veins, this crochet leaf is designed to capture the recognizable shape of a real maple leaf while still being quick enough for a relaxing seasonal project.
Make one in warm mustard.
Crochet another in burnt orange.
Add rust, burgundy, olive, brown, and cream, and suddenly you have an entire collection of handmade autumn leaves ready for decorating.
Use your finished leaves for:
- Fall garlands
- Thanksgiving table decor
- Autumn wreaths
- Gift toppers
- Napkin decorations
- Bag appliqués
- Seasonal displays
- Handmade cards
- Fall wall decor
And because each leaf uses only a small amount of yarn, this is also a wonderful scrap-yarn crochet project.
Why You’ll Love This Crochet Maple Leaf
This pattern is:
- Quick to crochet
- Great for yarn scraps
- Made in one main piece
- Designed with five distinct lobes
- Easy to customize
- Beautiful in many fall colors
- Perfect for garlands
- Lightweight for wreaths
- Useful for Thanksgiving decor
- Easy to batch-make
The finished leaf looks detailed, but the shape is created mainly by changing stitch heights.
Skill Level
Easy / Advanced Beginner
You’ll use:
- Chain
- Slip stitch
- Single crochet
- Half double crochet
- Double crochet
- Treble crochet
- Double treble crochet
- Simple picot
- Working into chain spaces
If you already know basic crochet stitches, the taller stitches are easy to learn.
Materials
Yarn
Use a small amount of:
Category 4 worsted-weight yarn
For one leaf, approximately:
15–25 yards
should be plenty.
Actual yardage depends on tension and leaf size.
Recommended Yarn Colors
For a classic autumn palette, try:
- Burnt orange
- Rust
- Mustard
- Deep red
- Burgundy
- Olive green
- Moss green
- Warm brown
- Camel
- Cream
Making every leaf a slightly different color creates a beautiful natural-looking collection.
Best Fiber
Both cotton and acrylic work well.
Cotton
Cotton produces:
- Crisp stitches
- Defined points
- Cleaner edges
- Excellent blocking
Acrylic
Acrylic creates:
- Softer leaves
- Slightly fuller texture
- Affordable seasonal decor
- Lots of color choices
Crochet Hook
4.0 mm crochet hook
A slightly firm fabric helps the leaf points maintain their shape.
If your stitches feel too tight, try:
4.5 mm
Other Supplies
- Yarn needle
- Scissors
- Blocking mat
- Rust-resistant pins
- Measuring tape
Optional:
- Fabric stiffener or starch
Crochet Abbreviations
This pattern uses US crochet terminology.
ch – chain
sc – single crochet
hdc – half double crochet
dc – double crochet
tr – treble crochet
dtr – double treble crochet
sl st – slip stitch
sp – space
st – stitch
Special Stitch: Picot
For a standard picot:
Ch 3, sl st into the first chain of those 3 chains.
The picot creates a sharper point at the end of each maple leaf lobe.
Double Treble Crochet
For a double treble crochet:
Wrap the yarn around the hook:
3 times
before inserting the hook into the stitch or space.
Yarn over and pull up a loop.
Then yarn over and pull through:
2 loops at a time
until only one loop remains.
This extra-tall stitch helps create the long central maple leaf point.
Finished Size
Using worsted yarn and a 4 mm hook, the finished leaf measures approximately:
5–5½ inches wide
and approximately:
5–6 inches tall including the stem
after blocking.
Your finished size may vary.
How the Maple Leaf Is Constructed
A maple leaf doesn’t have five identical points.
That’s important.
For the recognizable maple shape, we’ll make:
- One tall center lobe
- Two medium upper-side lobes
- Two shorter lower lobes
The stitches increase in height as you move toward each point and then decrease again.
This creates the valleys and pointed silhouette.
FREE CROCHET MAPLE LEAF PATTERN
Start
Make a:
Magic ring
Round 1 – Create the Five Lobe Spaces
Ch 1.
Work the following into the magic ring:
Sc, ch 5
Repeat:
[sc, ch 5]
four more times.
You should have:
5 sc
and:
5 ch-5 spaces
around the center.
Pull the magic ring closed.
Join with a sl st to the first sc.
Check Your Work
Count your large chain spaces.
You must have:
5
Each one will become one maple leaf lobe.
We’ll work them in this order:
- Lower right lobe
- Upper right lobe
- Tall center lobe
- Upper left lobe
- Lower left lobe
Round 2 – Shape the Five Maple Lobes
We’ll work each lobe differently.
This variation is what creates the maple leaf silhouette.
Lobe 1 – Lower Right
In the first ch-5 space work:
sc
hdc
dc
picot
dc
hdc
sc
Sl st into the next sc from Round 1.
This creates the first short lower lobe.
Lobe 2 – Upper Right
In the next ch-5 space work:
sc
hdc
dc
tr
picot
tr
dc
hdc
sc
Sl st into the next sc.
This lobe should be noticeably taller than the first.
Lobe 3 – Tall Center Point
In the center ch-5 space work:
sc
hdc
dc
tr
dtr
Then make:
Ch 4
Sl st into the first chain of those four chains to form a larger picot.
Continue:
dtr
tr
dc
hdc
sc
Sl st into the next Round-1 sc.
This should be the tallest lobe of the leaf.
Lobe 4 – Upper Left
Work into the next ch-5 space:
sc
hdc
dc
tr
picot
tr
dc
hdc
sc
Sl st into the next sc.
This mirrors Lobe 2.
Lobe 5 – Lower Left
In the final ch-5 space work:
sc
hdc
dc
picot
dc
hdc
sc
Sl st into the beginning of the round.
This mirrors Lobe 1.
Look at the Leaf Shape
You should now see:
- One long center point
- Two medium side points
- Two smaller lower points
The motif may still look soft or slightly curled.
That’s completely normal.
Blocking will make the maple shape much clearer.
PART 2: CROCHET THE STEM
Do not fasten off.
Position yourself at the bottom center between the two short lower lobes.
Stem
Ch:
11
Work Back Along the Stem
Starting in the second chain from the hook:
Sl st in every chain back toward the leaf.
This creates a narrow sturdy stem.
Secure the Stem
Sl st into the base of the leaf.
Fasten off.
Leave enough yarn to weave in securely.
Weave In the Ends
Using a yarn needle:
Weave each yarn tail through the back of several stitches.
Trim carefully.
PART 3: ADD THE CENTER VEIN
This step is optional, but I strongly recommend it.
The raised vein makes the maple leaf look much more detailed.
Embroidered Main Vein
Cut a strand of matching yarn approximately:
18 inches long
Thread your yarn needle.
Begin near the lower stem.
Work a line of:
surface running stitches
from the base toward the tall center lobe.
Keep the stitches straight and slightly raised.
Add Side Veins
From the center vein, add four shorter lines:
- One toward upper-right lobe
- One toward lower-right lobe
- One toward upper-left lobe
- One toward lower-left lobe
Don’t pull tightly.
You want the leaf to stay flat.
Crochet Surface-Slip-Stitch Option
Instead of embroidery, you can use:
surface slip stitch
across the front of the leaf.
This creates a thicker raised vein similar to the leaves shown in the Pinterest design.
Blocking Is Important
Immediately after crocheting, the points may curl inward.
Blocking transforms the shape.
It helps:
- Separate all five lobes
- Sharpen the points
- Deepen the valleys
- Straighten the stem
- Flatten the center
- Improve symmetry
How to Block the Maple Leaf
Lightly dampen the finished leaf.
Place it on a blocking mat.
Pin the center first.
Then pin:
- Tall center point
- Upper-right point
- Upper-left point
- Lower-right point
- Lower-left point
Finally:
Pin the stem straight.
Shape the Valleys
Use additional pins between the lobes.
Pull gently inward to make each valley more pronounced.
This gives the leaf a much more realistic maple silhouette.
Let It Dry Completely
Do not remove the pins until the leaf is:
completely dry
Once released, the leaf should hold a much cleaner shape.
Optional Stiffening
If you’re making:
- Garland
- Wall decor
- Wreath decoration
you may want slightly firmer leaves.
Use a small amount of:
- Fabric stiffener
- Craft starch
according to the manufacturer’s directions.
For soft appliqués, skip the stiffener.
Burnt Orange Maple Leaf
Burnt orange is one of the most recognizable fall colors.
It pairs beautifully with:
- Cream
- Mustard
- Brown
- Deep red
Mustard Maple Leaf
Warm mustard makes the stitch texture particularly visible.
This color looks beautiful on:
- Rustic wood
- Cream fabric
- Dark autumn backgrounds
Deep Red Maple Leaf
Try:
- Cranberry
- Burgundy
- Brick red
for a rich late-autumn palette.
Olive Green Leaf
Not every fall leaf has already turned orange.
Adding one or two olive-green leaves makes a garland look more natural.
Brown Maple Leaf
Warm cinnamon or chestnut brown works beautifully alongside mustard and rust.
Cream Maple Leaf
Cream creates a softer modern fall look.
Combine:
Cream + camel + sage + rust
for neutral farmhouse autumn decor.
Create a Five-Color Collection
Try:
- Rust
- Mustard
- Burgundy
- Olive
- Warm brown
Use the same pattern for every leaf.
The color variation creates the visual interest.
Make a Crochet Maple Leaf Garland
Crochet:
7–12 leaves
in several autumn colors.
Garland Chain
Using cream, brown, or rust yarn:
Ch approximately:
30
for the first hanging section.
Attach the First Leaf
Insert your hook near the upper portion of the leaf or stem junction.
Sl st to attach.
Space the Leaves
Ch:
20–25
between each leaf.
Attach the next leaf.
Continue until all leaves are connected.
Finish the Garland
After the final leaf:
Ch another:
30
Fasten off.
Garland Color Sequence
Try:
Rust → Mustard → Olive → Burgundy → Cream → Rust → Brown
Avoid arranging identical colors directly beside each other.
Mantel Decor
Drape your maple leaf garland across:
- Fireplace
- Bookshelf
- Entry table
- Window
Add:
- Pumpkins
- Pinecones
- Dried flowers
- Warm lights
for a complete autumn display.
Thanksgiving Table Decor
Scatter several leaves down the center of your dining table.
Combine them with:
- Linen napkins
- Mini pumpkins
- Natural wood
- Candles
- Pinecones
Napkin Decoration
Place one crochet maple leaf on top of each folded napkin.
Tie it with:
natural twine
for a handmade Thanksgiving table setting.
Place Cards
Attach a small kraft-paper name tag to the leaf stem.
Write each guest’s name.
After dinner, the leaf can become a small keepsake.
Crochet Leaf Wreath
Make:
10–15 leaves
in different fall colors.
Attach them around a simple wreath base.
Overlap the lobes slightly.
Add:
- Small crochet pumpkins
- Crochet acorns
- Neutral bow
if desired.
Gift Topper
Tie one leaf onto:
- Kraft-paper gift
- Fall gift basket
- Hostess gift
- Thanksgiving treat box
The leaf replaces disposable ribbon decoration.
Bag Appliqué
Skip stiffening.
Sew the leaf securely onto:
- Tote bag
- Crochet bag
- Market bag
Use matching yarn around the central section.
Blanket Appliqué
Make smaller leaves using DK yarn.
Sew them onto:
- Fall blanket
- Pillow cover
- Seasonal throw
Fall Pillow Decoration
Crochet several leaves.
Arrange them across the front of a plain pillow.
Use:
- Rust
- Mustard
- Burgundy
for a strong autumn palette.
Autumn Wall Hanging
Attach several maple leaves to:
- Natural wooden dowel
- Branch
- Crochet cord
Vary the hanging lengths.
Add tassels underneath.
Make Smaller Maple Leaves
Use:
DK or sport-weight yarn
with approximately a:
3–3.5 mm hook
The stitch sequence can remain the same.
Your finished leaf will simply be smaller.
Make Large Maple Leaves
Use:
Category 5 bulky yarn
with approximately:
6 mm hook
This creates bold leaves suitable for:
- Large garlands
- Wall decor
- Oversized wreaths
Use Crochet Thread
Fine crochet thread creates delicate maple leaves.
These can work for:
- Cards
- Small ornaments
- Table decorations
However, thread is less beginner-friendly than worsted yarn.
Turn It Into an Ornament
Add a hanging loop near the top of the center lobe.
Ch:
15–20
and join back to the leaf.
Hang it from:
- Seasonal branch display
- Thanksgiving tree
- Fall wreath
Use as a Coaster?
A large cotton version can be used decoratively under an ordinary mug if it lies flat.
However, the pointed irregular shape and raised veins make this pattern primarily a decorative leaf, not a heat-protective trivet.
For very hot cookware, use a pattern specifically designed for heat protection.
Best Yarn for Fall Garland Leaves
For garlands, almost any smooth yarn works.
Acrylic is ideal when you want:
- Many inexpensive colors
- Lightweight leaves
- Easy batch-making
Cotton is especially good when you want:
- Crisp points
- Strong stitch definition
- Flatter motifs
Scrap-Yarn Project
This is an excellent way to use leftover yarn.
You don’t need enough of any one color for a large project.
Small amounts of:
- Orange
- Yellow
- Brown
- Red
- Green
are perfect.
Batch Crochet Method
Making 12 leaves?
Don’t necessarily finish one leaf at a time.
Try:
Step 1
Make all Round 1 centers.
Step 2
Complete all five-lobe rounds.
Step 3
Add every stem.
Step 4
Weave in all ends.
Step 5
Add veins.
Step 6
Block all leaves together.
This makes garland production much easier.
Make Every Leaf Slightly Different
Real autumn leaves aren’t identical.
Try changing:
- Yarn color
- Stem length
- Blocking angle
- Vein color
while keeping the main stitch pattern the same.
Two-Tone Maple Leaf
Use one color for the main leaf.
Embroider the veins in a contrasting color.
Examples:
Rust leaf + dark brown veins
Mustard leaf + burnt-orange veins
Cream leaf + camel veins
Burgundy leaf + rust veins
Variegated Yarn
A fall-colored variegated yarn can create beautiful natural color transitions.
Look for combinations containing:
- Red
- Orange
- Mustard
- Brown
Solid colors generally show the stitch structure more clearly, though.
Handmade Autumn Gift
Make:
5 crochet maple leaves
in coordinated colors.
Tie them together with natural twine.
Package them as:
Handmade Fall Decorations
The recipient can use them for:
- Table decor
- Garland
- Gifts
- Wreaths
Thanksgiving Hostess Gift
Pair a set of crochet leaves with:
- Fall candle
- Tea towel
- Small pumpkin
- Mug
for a cozy handmade hostess gift.
Craft Fair Idea
Crochet leaves can be displayed as:
- Individual appliqués
- Sets of five
- Garland sets
- Wreath decorations
- Gift toppers
Small projects also make it easy to offer several color combinations.
Photographing Crochet Maple Leaves
For Pinterest photographs, use a warm rustic background.
Good props include:
- Weathered wood
- Cream knit fabric
- Acorns
- Pinecones
- Dried flowers
- Real fall leaves
Keep the crochet leaves larger and sharper than the props so it’s obvious which objects are the handmade project.
Why the Center Point Is Taller
One of the easiest ways to accidentally create a star instead of a maple leaf is to make all five points identical.
The center lobe should be:
clearly tallest
The two upper side lobes are:
medium
The two lower lobes are:
shortest
That hierarchy creates the maple-leaf appearance.
Common Beginner Mistakes
Making All Five Lobes the Same
Follow the different stitch heights carefully.
This is the most important shaping detail.
Wrong Number of Chain Spaces
Round 1 must contain:
5 ch-5 spaces
Count before continuing.
Points Looking Rounded
Make sure the picot sits at the center of every lobe.
Blocking will sharpen them further.
Center Lobe Too Short
Check that you’re using:
double treble crochet
around the center point.
Leaf Curling
Some curling before blocking is normal.
Block before deciding something is wrong.
Overblocking
Stretch gently.
If you pull too hard, the stitches may become thin and distorted.
Stem Twisting
Pin the stem straight while blocking.
Veins Pulling the Leaf
Keep embroidery tension loose.
The leaf should remain flat.
How Long Does One Maple Leaf Take?
Once you’re comfortable with the taller stitches, the motif works up quickly.
Current maple-leaf patterns are commonly positioned as quick seasonal projects suitable for garlands, appliqués, table settings, and wreaths.
For your first leaf, focus on shaping rather than speed.
Can Complete Beginners Make It?
If you’re brand-new to crochet, practice:
- sc
- hdc
- dc
first.
Then try:
- tr
- dtr
- picot
The actual construction is short, so this makes a useful project for learning different stitch heights.
Can I Skip the Double Treble?
Yes.
Replace the dtr stitches in the center lobe with:
tr
Your leaf will have a slightly shorter central point.
Can I Skip the Veins?
Absolutely.
The five-lobed shape works without them.
The veins simply add extra texture and realism.
Can I Skip Blocking?
You can, but I don’t recommend it.
For a shaped motif like a maple leaf, blocking greatly improves the final appearance.
Can I Make a Garland With Different Leaf Sizes?
Yes.
Mix:
- Worsted
- DK
- Sport
versions of the same pattern.
Different sizes can make the garland feel more natural.
Frequently Asked Questions
How many points should a crochet maple leaf have?
This pattern uses five main lobes: one tall center lobe, two medium upper lobes, and two shorter lower lobes.
What yarn weight is used?
Category 4 worsted-weight yarn.
What hook size is used?
4.0 mm.
How large is the finished leaf?
Approximately 5–5½ inches wide after blocking.
Is it worked in the round?
The main leaf begins around a center ring and the five lobes are worked outward.
Is blocking necessary?
Strongly recommended. It sharpens the points and creates deeper valleys.
Can I use scrap yarn?
Yes. One leaf requires only a small amount.
Can I make a garland?
Yes. Crochet several leaves and connect them with a long chain.
Can I use cotton?
Yes. Cotton is especially good for crisp, well-defined maple leaves.
Final Thoughts
Autumn crochet doesn’t have to mean starting a large blanket or sweater.
Sometimes one little handmade leaf is enough to bring the season into your home.
This free crochet maple leaf pattern uses different stitch heights to create five distinct lobes, one tall center point, two shorter side sections, and a narrow stem.
Add embroidered veins for extra texture.
Block the finished leaf carefully.
Then make another in a different autumn color.
Before long, you can have an entire collection of rust, mustard, burgundy, green, and brown maple leaves ready for garlands, Thanksgiving tables, wreaths, gifts, and cozy fall displays.
Save this easy crochet maple leaf pattern for your autumn project list!