Crochet Christmas Tree Wall Hanging Pattern – Modern Holiday Decor
Christmas decorating doesn’t have to mean covering every surface with ornaments.
Sometimes one simple handmade piece can make an entire room feel festive.
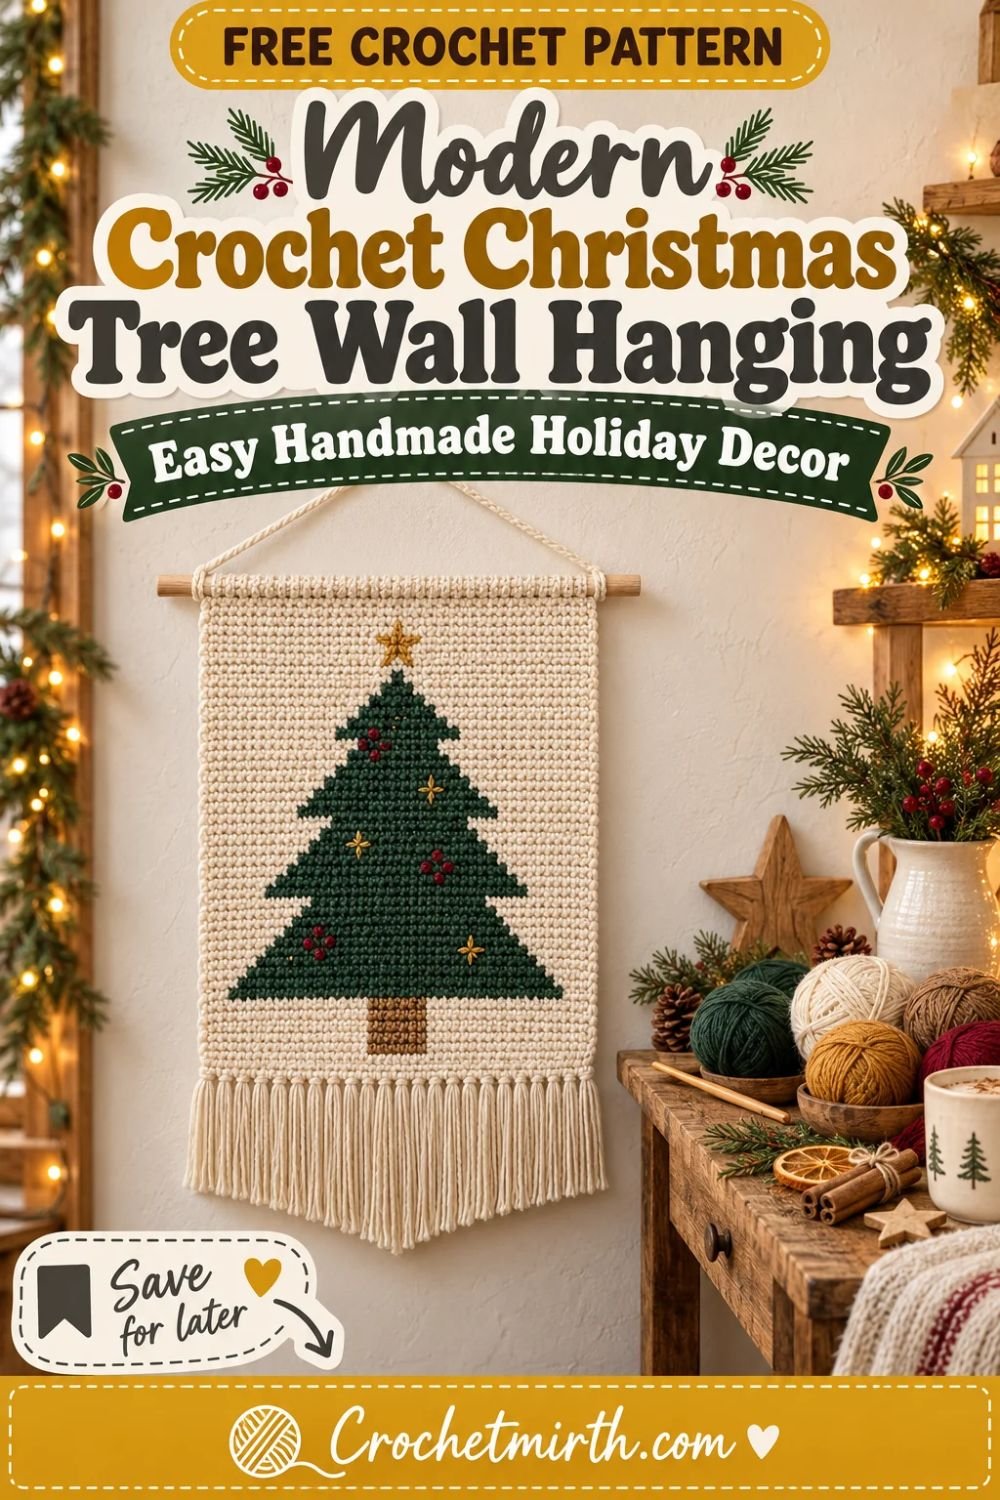
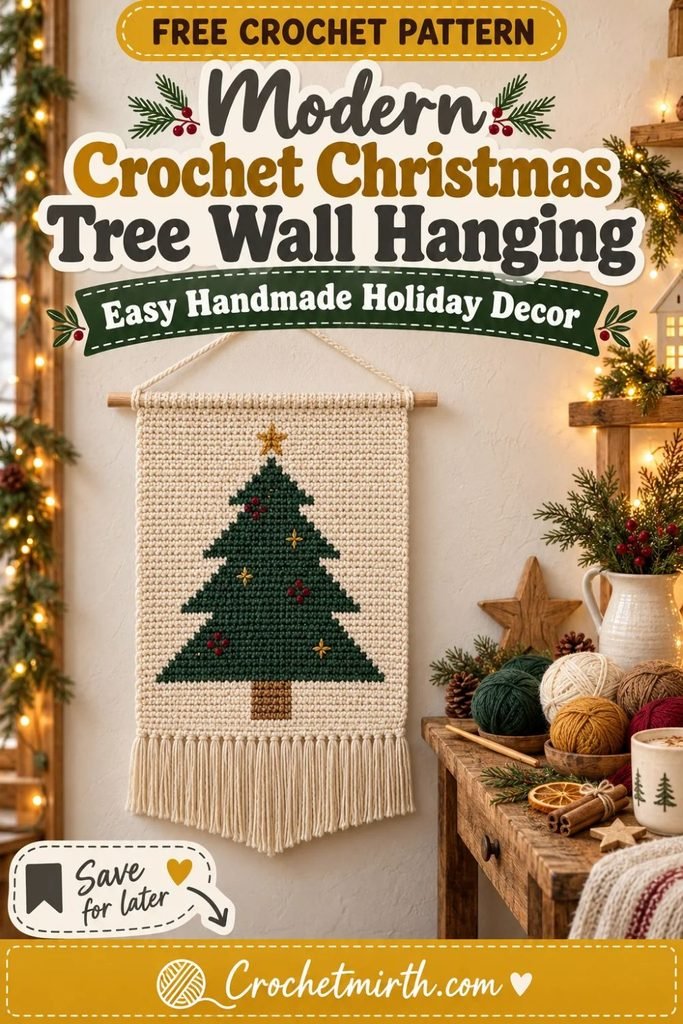
This crochet Christmas tree wall hanging pattern creates a modern rectangular tapestry featuring a bold forest-green tree on a warm-cream background.
A small camel trunk, natural wooden dowel, soft crochet hanging cord, and simple fringe complete the design.
Unlike the Bobble Christmas Tree Pillow, this project uses tapestry-style color blocking instead of textured bobbles.
The Christmas tree is crocheted directly into the rectangular panel.
There are no separate tree appliqués to sew on afterward.
The result is clean, geometric, and easy to style with farmhouse, Scandinavian, rustic, woodland, or minimalist Christmas decor.
Why You’ll Love This Christmas Wall Hanging
This design is:
- Worked mostly in single crochet
- Flat and easy to store
- Reusable every Christmas
- Made with worsted-weight yarn
- Mounted on a simple wooden dowel
- Customizable in color
- Beginner-friendly tapestry crochet
- Easy to enlarge or reduce
- Perfect for leftover Christmas yarn
- Suitable for walls, doors, entryways, or mantels
The large tree motif comes entirely from simple color changes.
Once you understand where each color begins and ends, the pattern becomes very repetitive.
Skill Level
Advanced Beginner
You should know how to:
- Chain
- Single crochet
- Change colors
- Work flat in rows
- Carry yarn for short distances
- Crochet a simple cord
- Add fringe
- Sew with a yarn needle
- Block a rectangular crochet panel
No complicated shaping or three-dimensional assembly is required.
Finished Measurements
The main crochet panel measures approximately:
12 inches wide × 17 inches tall
before fringe.
With the lower fringe, expect an overall textile length around:
21–22 inches.
The recommended wooden dowel is approximately:
14 inches long.
The final hanging height depends on the hanging cord.
Materials
Use Category 4 worsted-weight yarn.
For the sample:
Color A — Warm Cream
Approximately:
300–350 yards
Color B — Deep Forest Green
Approximately:
90–110 yards
Color C — Warm Camel
Approximately:
15–20 yards
Optional Accent Colors
Small scraps of:
Muted cranberry
and:
Mustard gold
You’ll also need:
- 4.5 mm crochet hook
- 14-inch wooden dowel
- Yarn needle
- Scissors
- Measuring tape
- Stitch markers
- Blocking mat or towel
- Rust-resistant pins, optional
Gauge
Approximately:
15 sc = 4 inches
and:
14 rows = 4 inches
Gauge doesn’t need to be exact, but maintaining a firm consistent fabric helps the wall hanging stay rectangular.
The finished width matters more than the exact row gauge.
After several rows, check that your panel is close to:
12 inches wide.
Crochet Abbreviations
This pattern uses US terminology.
ch – chain
sc – single crochet
sl st – slip stitch
st / sts – stitch / stitches
RS – right side
WS – wrong side
Tapestry Crochet Basics
Each row contains:
45 stitches.
When changing colors, begin the final single crochet before the color change as normal.
Insert the hook.
Yarn over.
Pull up a loop.
You now have two loops on the hook.
Drop the old color.
Yarn over with the new color and pull through both loops.
The new color is now ready for the next stitch.
This creates a cleaner transition than completing the entire stitch in the old color.
Should You Carry the Yarn?
Across short sections, yes.
Across large cream margins, no.
For example, while working a wide green tree row, you can carry the unused cream yarn inside the green stitches across the tree section.
However, when a color would need to travel across 15–20 background stitches, it’s cleaner to use a separate cream yarn ball on either side.
For this pattern, using:
Cream Ball 1 → Green → Cream Ball 2
creates the cleanest tapestry.
Construction Overview
The panel is worked from the:
bottom upward.
You’ll first crochet a small cream margin.
Then add the camel trunk.
Above the trunk, the forest-green tree begins at its widest point.
Every four rows, the tree becomes:
4 stitches narrower.
This creates a modern stepped silhouette that gradually tapers toward one stitch at the top.
After the tree is complete, several plain cream rows create breathing room before the wooden dowel.
PART 1: Begin the Background
Using warm-cream yarn:
Ch 46.
Row 1
Sc in the second chain from the hook and across.
45 sts
Ch 1 and turn.
Rows 2–6
Sc across in cream.
45 sts
Ch 1 and turn after each row.
You now have a simple lower border beneath the tree.
PART 2: Crochet the Tree Trunk
The trunk is centered over five stitches.
Because the row contains 45 stitches:
20 cream + 5 camel + 20 cream = 45
Row 7
Sc 20 in cream.
Change to camel.
Sc 5.
Change back to cream.
Sc 20.
45 sts
Rows 8–12
Repeat Row 7.
The trunk should now form a narrow rectangle.
Fasten off the camel yarn after Row 12.
PART 3: Crochet the Forest-Green Tree
The tree contains 9 width sections.
Each section is worked for:
4 rows.
The tree widths are:
33 → 29 → 25 → 21 → 17 → 13 → 9 → 5 → 1
Because every width is an odd number, the tree stays perfectly centered over the 5-stitch trunk.
Tree Chart
| Rows | Cream Left | Green Tree | Cream Right |
|---|---|---|---|
| 13–16 | 6 | 33 | 6 |
| 17–20 | 8 | 29 | 8 |
| 21–24 | 10 | 25 | 10 |
| 25–28 | 12 | 21 | 12 |
| 29–32 | 14 | 17 | 14 |
| 33–36 | 16 | 13 | 16 |
| 37–40 | 18 | 9 | 18 |
| 41–44 | 20 | 5 | 20 |
| 45–48 | 22 | 1 | 22 |
Every row contains exactly:
45 stitches.
Rows 13–16
Sc:
6 cream
then:
33 forest green
then:
6 cream.
Ch 1 and turn.
Repeat for four rows total.
This creates the wide base of the tree.
Rows 17–20
Work:
8 cream
29 forest green
8 cream
Repeat for four rows.
Rows 21–24
Work:
10 cream
25 forest green
10 cream
Repeat for four rows.
Rows 25–28
Work:
12 cream
21 forest green
12 cream
Repeat for four rows.
Rows 29–32
Work:
14 cream
17 forest green
14 cream
Repeat for four rows.
Rows 33–36
Work:
16 cream
13 forest green
16 cream
Repeat for four rows.
Rows 37–40
Work:
18 cream
9 forest green
18 cream
Repeat for four rows.
Rows 41–44
Work:
20 cream
5 forest green
20 cream
Repeat for four rows.
Rows 45–48
Work:
22 cream
1 forest-green stitch
22 cream
Repeat for four rows.
Fasten off the forest-green yarn after Row 48.
You now have a complete geometric Christmas tree.
PART 4: Finish the Upper Background
Rows 49–60
Using warm cream:
Sc across.
45 sts
Ch 1 and turn.
After Row 60:
Fasten off.
Your complete tapestry panel should now measure approximately:
12 × 17 inches.
Check the Tree Placement
Lay the panel flat.
The tree should have:
- Broad 33-stitch base
- Nine stepped levels
- Single-stitch upper tip
- Centered camel trunk
- Equal cream margins on both sides
If one edge looks narrower, recount the rows before weaving in your ends.
PART 5: Weave in the Ends
Turn the panel to the wrong side.
Weave every yarn tail through stitches of the same color.
Avoid pulling tightly.
Pulling the tails too firmly can distort the edges of a tapestry panel.
Change direction while weaving each tail to help secure it.
PART 6: Optional Modern Ornament Details
The basic wall hanging can remain completely minimalist.
The plain forest-green tree looks especially modern by itself.
If you’d like a little more Christmas color, use small scraps of cranberry and mustard yarn.
With a yarn needle, embroider:
5–7 tiny crosses or vertical stitches
across the green tree.
Keep them widely spaced.
Don’t cover the clean tree silhouette.
Suggested Accent Placement
Try:
2 cranberry accents
2 mustard accents
1 cream accent
on the lower half.
Add only:
1–2 accents
to the upper half.
A restrained decoration looks more modern than filling every branch.
PART 7: Add a Tiny Embroidered Star
Using mustard-gold yarn, place a small star approximately:
1 inch above the green tree point.
Make five or six straight stitches radiating from one center point.
Keep the finished star approximately:
¾–1 inch wide.
This gives a subtle tree-topper effect without sewing on a separate crochet applique.
Minimalist Alternative
Skip the star entirely.
A forest-green geometric tree on cream is enough to create a clearly recognizable Christmas motif.
PART 8: Block the Panel
Blocking makes a major difference to tapestry wall hangings.
Lightly dampen the crochet according to your yarn’s care instructions.
Lay the panel on a flat surface.
Measure the top and bottom.
Both should be approximately:
12 inches wide.
Pin the four corners.
Then straighten both side edges.
Make sure the tree remains centered.
Let the panel dry completely.
Why Blocking Matters
Colorwork can slightly pull the fabric where colors change.
Blocking helps:
- Straighten the sides
- Square the corners
- Relax the color transitions
- Flatten the fabric
- Improve the overall wall-hanging silhouette
Don’t stretch aggressively.
PART 9: Create the Dowel Casing
Turn the panel so the:
wrong side faces upward.
Place the wooden dowel horizontally near the upper edge.
Fold approximately the top:
4 rows
over the dowel toward the back.
Using cream yarn and a needle, whip stitch the folded edge to the back of the panel.
Catch only small portions of the back stitches so your sewing doesn’t show clearly from the front.
Continue all the way across.
The dowel should move slightly inside the casing but not fall out.
Dowel Size
A:
14-inch wooden dowel
gives approximately one inch of exposed wood at either side of the 12-inch panel.
This creates a balanced modern appearance.
You can also use a smooth natural branch.
PART 10: Crochet the Hanging Cord
Using warm-cream yarn:
Ch 80.
Starting in the second chain from the hook:
Sl st back through every chain.
Fasten off.
This creates a strong narrow crochet cord.
Attach the Cord
Tie or sew one end securely around the left side of the wooden dowel.
Attach the other end to the right side.
When lifted from the middle, the cord should form a soft:
triangle
above the wall hanging.
Adjust the cord length before securing permanently.
PART 11: Add the Fringe
Cut:
46 pieces of cream yarn
approximately:
12 inches long.
You’ll use:
2 strands per fringe bundle.
This creates:
23 fringe bundles.
Attach the Fringe
Fold two strands in half.
Insert the crochet hook through the first stitch along the lower edge.
Pull the folded loop through.
Pass all four yarn ends through the loop.
Pull gently.
Skip the next stitch.
Attach another bundle in the following stitch.
Continue in approximately every other stitch across.
Because the panel has 45 stitches, you’ll finish with approximately:
23 evenly spaced bundles.
Trim the Fringe
The folded 12-inch strands create fringe roughly:
6 inches long.
Trim them to approximately:
5 inches.
For a modern look, you have two options.
Straight Fringe
Trim the entire bottom edge evenly.
Gentle V Fringe
Keep the center strands about:
½–1 inch longer
than the outer strands.
Trim gradually from each side toward the center.
A subtle V shape looks particularly good with the triangular tree.
Your Christmas Tree Wall Hanging Is Finished
Hang the piece and step back.
Check:
- Tree centered
- Dowel level
- Fringe even
- Panel hanging flat
- Hanging cord balanced
Adjust as needed.
Classic Modern Version
Use:
Warm cream background
Forest-green tree
Camel trunk
Mustard star
This is the recommended Crochetmirth version.
Scandinavian Version
Use:
Oatmeal background
Muted forest-green tree
Natural camel trunk
Skip all ornament embroidery.
The simplicity works beautifully with natural wood.
Neutral Christmas Version
Use:
Cream background
Oatmeal tree
Camel trunk
Add only one mustard star.
This creates a very subtle holiday wall piece.
Cranberry Christmas Tree
Replace the forest green with:
deep cranberry
for a less traditional but festive tree.
Keep the background cream.
Sage Christmas Tree
Muted sage creates a softer modern farmhouse version.
Pair it with oatmeal fringe and a camel trunk.
Dark Green Background Version
Reverse the primary colors.
Use:
Forest-green background
with:
warm-cream tree.
This produces a dramatic wall hanging that works especially well against white walls.
Monochrome Texture Version
Want an even more minimalist look?
Crochet the entire panel in cream.
Instead of color changes, surface-crochet the tree outline afterward using cream yarn.
The tree appears mostly through subtle raised texture and shadow.
Add Simple Stripes
Add one or two thin horizontal camel stripes near the lower edge of the panel.
Keep them below the tree.
This gives the wall hanging a stronger woven-fiber-art appearance.
Add Crochet Bobbles
If you’d like more texture, replace a few selected green tree stitches with bobbles.
Use no more than:
5–7 bobbles
so this project remains visually different from your full Bobble Christmas Tree Pillow.
Add Tiny Crochet Ornaments
Small flat circles can be sewn onto the tree.
Try:
- Cranberry
- Mustard
- Cream
Keep them under:
½ inch
so the modern tree shape remains visible.
Add Wooden Beads
A few small natural wooden beads can be attached to embroidered yarn strands.
Keep bead use minimal for a Scandinavian style.
Without Fringe
Prefer cleaner wall decor?
Skip the entire fringe section.
The rectangular panel can end with a simple cream border.
This makes the design feel even more contemporary.
Longer Fringe
For a bohemian look, cut the yarn approximately:
18 inches long
before folding.
Trim the finished fringe to:
8 inches.
Comb or separate the strands gently if your yarn allows it.
Natural Branch Version
Replace the straight dowel with a clean dry tree branch approximately:
14–16 inches long.
This works particularly well with farmhouse and woodland Christmas decor.
Make sure the branch is strong and free of sharp bark that could damage the yarn.
Door Hanging
This piece can also be used on an interior door.
Because it is lightweight and flat, it takes up less space than a traditional wreath.
Avoid exposing ordinary yarn to rain or snow.
Entryway Decor
Hang it above a small console table.
Style with:
- Evergreen
- Wooden houses
- Candle-style LED lights
- Pinecones
The rectangular shape works well in narrow spaces.
Mantel Wall Decor
Center the hanging above a mantel.
Pair it with your:
- Crochet stockings
- Crochet star ornaments
- Bell ornaments
- Bow garland
Using the same forest-green, cranberry, cream, and mustard palette will make the entire collection feel coordinated.
Christmas Nursery Decor
Make the tree in sage instead of dark green.
Use cream fringe.
Skip beads or removable decorations.
The result becomes a softer seasonal wall decoration.
Handmade Christmas Gift
Because the piece lies relatively flat, it can be folded carefully and gifted.
Pair it with a natural wooden dowel and hanging cord already attached.
Use Scrap Yarn for the Accents
The main cream and green areas require full quantities, but the trunk, star, and ornaments need only tiny scraps.
Use leftover camel, cranberry, and mustard from your other Christmas projects.
Make It Smaller
For a mini wall hanging, use:
DK yarn + 3.5–4 mm hook.
The same stitch counts will naturally create a smaller panel.
Use a shorter dowel.
Make It Wider
Add cream stitches equally to both sides.
For example, add:
5 extra cream stitches to the left
and:
5 to the right.
The tree chart can stay unchanged.
Make the Tree Wider
Increase every tree width.
For example:
37 → 33 → 29 → 25…
Just keep the tree centered and make sure the panel is wide enough.
Make the Tree Taller
Instead of working each tree width for four rows, work each one for:
5 rows.
This produces a longer, slimmer tree.
Why Single Crochet?
Single crochet is ideal for this wall hanging because it creates:
- Dense fabric
- Clear color blocks
- Straight edges
- Good tapestry definition
- Minimal gaps
Taller stitches can create softer boundaries between colors.
Best Yarn for a Crochet Wall Hanging
Firm Acrylic
A firm acrylic yarn gives excellent stitch definition and is affordable for a medium-sized wall hanging.
Cotton
Cotton produces crisp colorwork and lies very flat.
It is one of the best options for tapestry-style crochet.
Cotton/Acrylic Blend
This provides structure while keeping the finished project lighter.
Wool Blend
A wool blend can create beautiful natural texture, especially for farmhouse decor.
Avoid Extremely Stretchy Yarn
Very soft or stretchy yarn can make the wall hanging:
- Sag
- Narrow at the top
- Curl around the fringe
Choose yarn with reasonable structure.
Managing Tapestry Tension
One of the most important skills in this project is keeping unused yarn loose enough.
If carried yarn is pulled too tightly:
- Tree edges pucker
- Panel becomes narrower
- Fabric curves inward
Every few stitches, spread the finished stitches along your hook or finger to keep the hidden yarn relaxed.
Keep Color Changes Clean
Always make the color change during the:
final yarn-over of the stitch before the new color begins.
This makes the next stitch appear fully in the new color.
Common Beginner Problems
Tree Leans to One Side
Check the cream stitch count on both sides.
The margins should always be equal.
Panel Gets Narrower
You may be skipping the first or last stitch.
Count:
45 stitches
regularly.
Tree Area Puckers
Your carried yarn is too tight.
Loosen it before continuing.
Green Shows Through Cream
Avoid carrying dark green through large cream sections.
Use separate cream yarn sources instead.
Dowel Casing Shows From the Front
Take smaller sewing bites on the back of the panel.
Wall Hanging Curls
Block the panel thoroughly before attaching the dowel.
Fringe Looks Uneven
Hang the completed piece before trimming the final fringe length.
Gravity changes how the strands fall.
Blocking
Blocking is strongly recommended.
Wall hangings are viewed as flat decorative pieces, so crooked edges are more noticeable than they might be on a scarf or blanket.
Take time to square the panel before assembly.
Care
Dust gently or hand wash according to your yarn manufacturer’s recommendations.
Remove the wooden dowel first if possible.
Do not soak unfinished natural wood.
Reshape and dry the crochet panel flat.
Storage After Christmas
Remove the dowel if your casing allows it.
Lay the panel flat.
Place tissue over the fringe.
Roll loosely rather than making sharp folds across the tapestry tree.
Store in a dry box until next Christmas.
Frequently Asked Questions
How large is the wall hanging?
Approximately 12 × 17 inches before fringe.
What yarn weight is used?
Category 4 worsted-weight yarn.
What hook size is used?
4.5 mm.
What size dowel do I need?
Approximately 14 inches.
Is the tree sewn on afterward?
No. It’s worked directly into the panel using tapestry-style color changes.
Is this the same construction as the Bobble Tree Pillow?
No. The pillow uses raised bobbles. This wall hanging uses flat geometric colorwork.
Can beginners make it?
A confident beginner comfortable with color changes should be able to complete it.
Do I have to add fringe?
No. The pattern looks modern with or without fringe.
Can I use cotton yarn?
Yes. Cotton is excellent for crisp tapestry crochet.
Can I make the tree undecorated?
Absolutely. The plain forest-green tree is the recommended minimalist version.
Final Thoughts
Modern Christmas decor doesn’t need to be complicated.
This crochet Christmas tree wall hanging pattern uses simple single crochet and carefully placed color changes to build a large geometric evergreen tree directly into a warm-cream tapestry.
Add a camel trunk.
Mount it onto natural wood.
Finish it with simple fringe.
And you have a holiday decoration that feels festive without being overly busy.
Use forest green for classic Christmas style, sage for a softer farmhouse version, or keep everything neutral for a Scandinavian-inspired home.
When the holidays are over, the flat construction also makes it easy to store and bring back next December.
Save this modern crochet Christmas tree wall hanging pattern for your handmade holiday home decor collection!